
- Create a new image
- Open, Show & Save images (PIL)
- Paste, Merge, Blend images (PIL)
- How to Draw shapes images (PIL)
- How to Crop an image (PIL)
- How to Add Text to images (PIL)
- How to Add Frames to images (PIL)
- How to Resize an image (PIL)
- Brightness, Contrast, Saturation
- Convert image to Grayscale | B&W
- Create Photo Collages
- Digital Image Color Modes
- Digital Image Basics
- Image Manipulation w/ PIL
- Batch Resize Multiple Images (PIL)
- Watermarking Images
- Difference Between 2 Images (PIL)
How to Add Text to Images in Python (via PIL Library)
Introduction
In this Python tutorial we will show how to add text to images in Python using the PIL image manipulation library.
Our tutorial will gradually get more sophisticated and we will supplement it with creative examples towards the end for inspiration and as demonstration of more advanced Python applications.
We are going to be using Image, the ImageDraw and the ImageFont module from the PIL library mainly. We will also refer to ImageColor to see some available built-in color options. So, let’s start with importing those Python libraries first.
from PIL import Image, ImageDraw, ImageFont, ImageColor
Adding Text on Images with Python in 4 Steps
We can break up adding text to images to 4 steps.
- Step 1: Create or open an image
- Step 2: Create a drawing object
- Step 3: Prepare text elements
- Step 4: Add text to the image
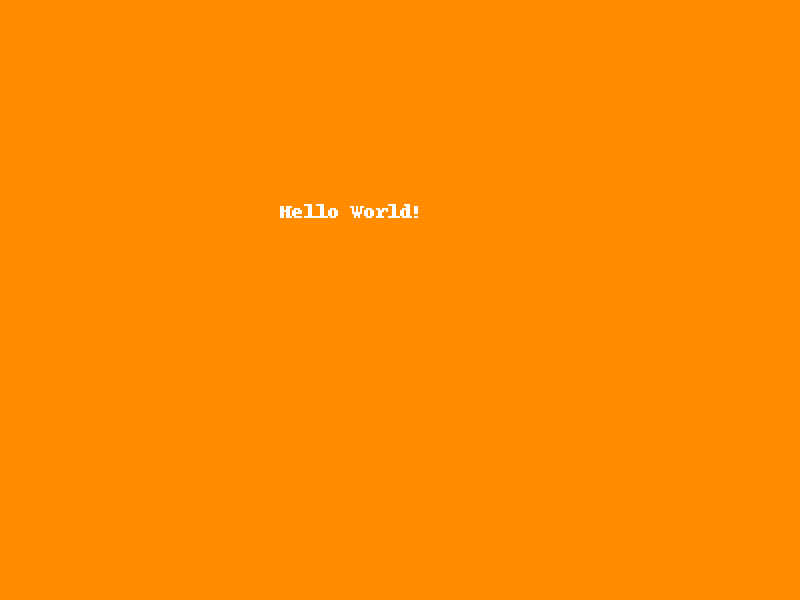
Step 1: Creating a New Image
You can create a new image using PIL’s .new() method as below. It’s important to pay attention to color modes here as they can significantly impact the image manipulations that can be done on them as well as image saving options.
Here is a new image example with .new() method. First parameter is the color mode of the image while the second parameter in a tuple is the dimensions (how to get dimensions of an image) of the image.
We are going to also need an image object to write text on. We have a couple options for obtaining an image object in pillow image manipulation library.
Using the PIL library, we can “create a new image” or we can “open an existing image” as an image object in Python. Let’s start with creating a simple image object for the sake of simplicity.
Here is a new image example using PIL’s or pillow’s Image module. So, mode and size arguments are mandatory while we can also pass an optional color argument as below to energize this Python tutorial a bit.
img = Image.new(mode="RGBA", size=(400,300), color='darkorange')
img.show()

You can see a full list of available color names and their hex codes in the Python color tutorial below as well as discover various colormaps and how to derive discrete colors from them.
Additionally, we have an in-depth Python tutorial about color modes and how to use them with Python images using the PIL (pillow) digital image editing library.
Step 2: Creating a Draw Object
Creating a draw object is as simple as it gets. We will use ImageDraw module we’ve already imported and Draw class from this module.
The most important nuance at this point is the fact that we are using Draw class on the image we have already created (or opened). This Draw class item will act as a handle to write our text in the following steps.
Here is the Python code to create a draw object with PIL.
(And we have an extensive, well-researched tutorial about drawing geometric shapes in images with Python.)
draw = ImageDraw.Draw(img)
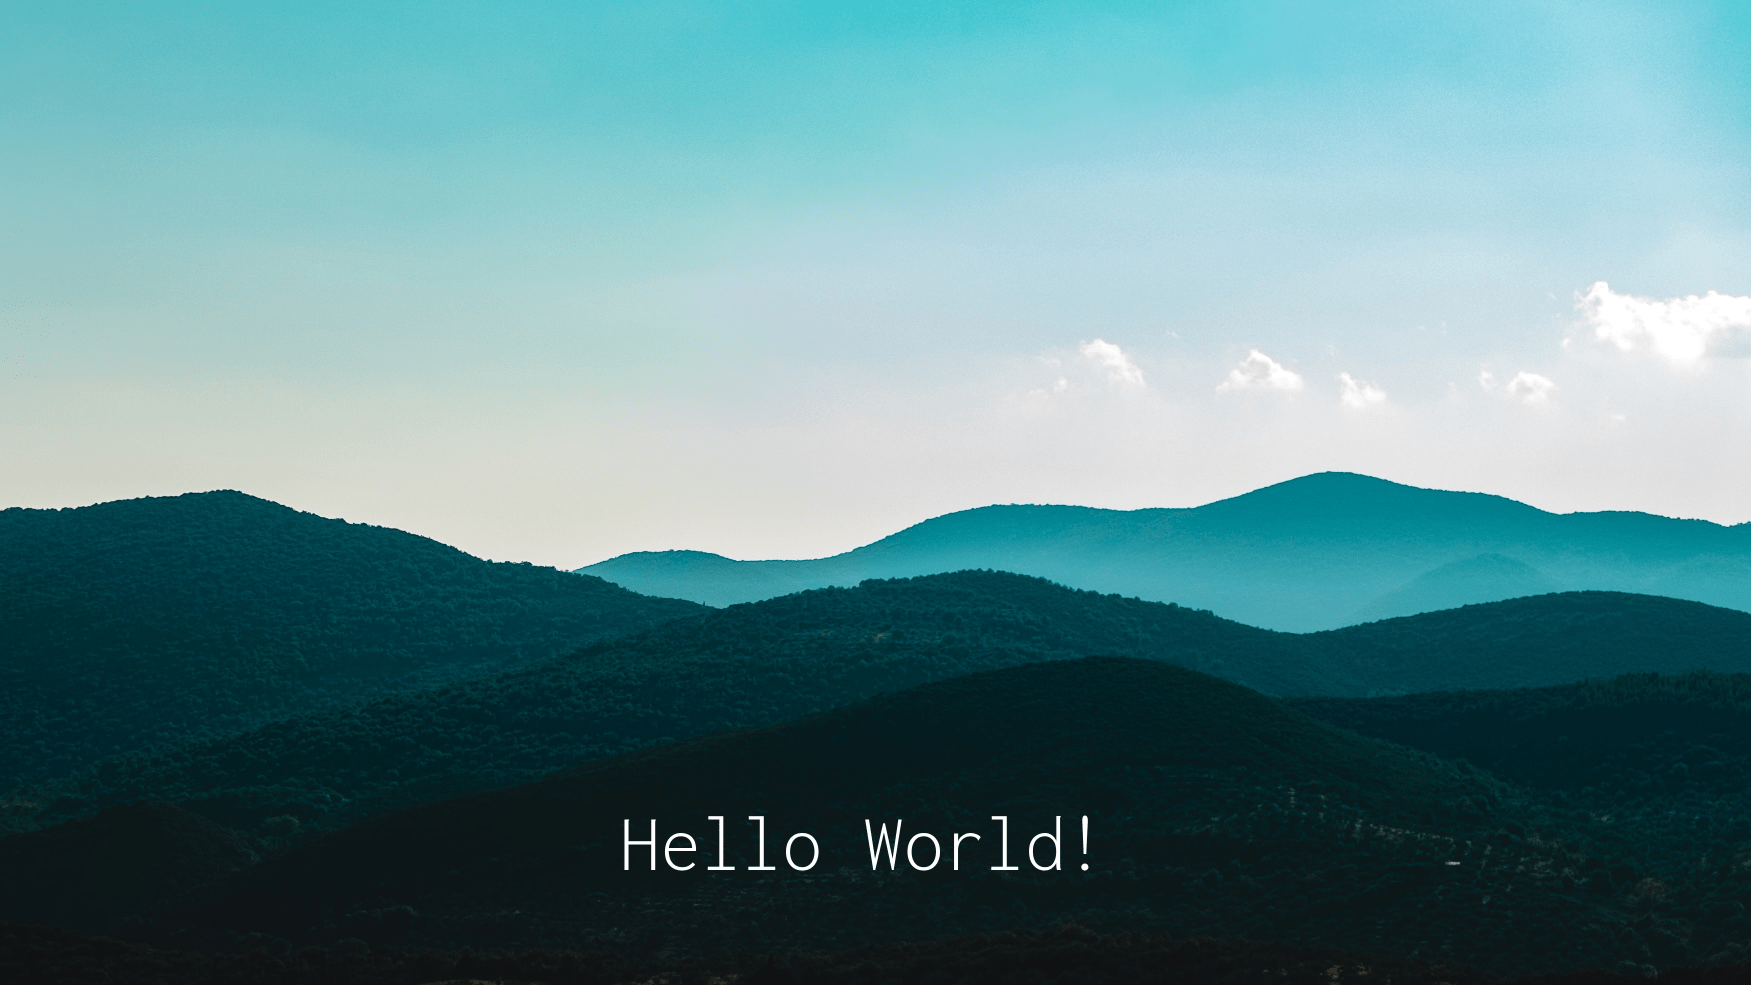
Step 3: Preparing Text Elements
Next we can assign our text to a variable.
text = "Hello World!"
Alternatively, you can pass a string directly to the draw function below without using an additional variable.
Step 4: Adding Text to the Image
Finally, using the draw object we’ve created earlier, we can add our text element to the image. Here, we need to pass minimum two arguments. These are x, y coordinates of the text and the text itself.
draw.text((140, 100), text)
img.show()
So, at the most basic level Python code for adding text to images looks like this:
img = Image.new(mode="RGBA", size=(400,300), color='darkorange')
draw = ImageDraw.Draw(img)

draw.text((140, 100), "Hello World!")
img.show()
Built-in Color Names in PIL (Pillow)
Darkorange is a lovely built-in color name in pillow’s color repertoire. Moreover you can choose from a plethora of cool built-in colors that are available in PIL.ImageColor class.
Pillow uses a superset of HTML 4.0 color names used in CSS 1. To get a full list of these color names you can refer to the colormap attribute inside ImageColor module. Here is the Python code for that:
colors=ImageColor.colormap
for i in colors.keys():
    print(i)
* keys() is a useful method for dictionaries in Python that provides only the keys in a dictionary. Since colormap attribute of ImageColor class is a dictionary of key-value pairs where keys are built-in color names and values are their hex codes. You can visit our dictionary exercises and dictionary lessons if you need to polish your Python dictionary knowledge.
aliceblue
antiquewhite
aqua
aquamarine
azure
beige
bisque
black
blanchedalmond
blue
blueviolet
brown
burlywood
cadetblue
chartreuse
chocolate
coral
cornflowerblue
cornsilk
crimson
cyan
darkblue
darkcyan
darkgoldenrod
darkgray
darkgrey
darkgreen
darkkhaki
darkmagenta
darkolivegreen
darkorange
darkorchid
darkred
darksalmon
darkseagreen
darkslateblue
darkslategray
darkslategrey
darkturquoise
darkviolet
deeppink
deepskyblue
dimgray
dimgrey
dodgerblue
firebrick
floralwhite
forestgreen
fuchsia
gainsboro
ghostwhite
gold
goldenrod
gray
grey
green
greenyellow
honeydew
hotpink
indianred
indigo
ivory
khaki
lavender
lavenderblush
lawngreen
lemonchiffon
lightblue
lightcoral
lightcyan
lightgoldenrodyellow
lightgreen
lightgray
lightgrey
lightpink
lightsalmon
lightseagreen
lightskyblue
lightslategray
lightslategrey
lightsteelblue
lightyellow
lime
limegreen
linen
magenta
maroon
mediumaquamarine
mediumblue
mediumorchid
mediumpurple
mediumseagreen
mediumslateblue
mediumspringgreen
mediumturquoise
mediumvioletred
midnightblue
mintcream
mistyrose
moccasin
navajowhite
navy
oldlace
olive
olivedrab
orange
orangered
orchid
palegoldenrod
palegreen
paleturquoise
palevioletred
papayawhip
peachpuff
peru
pink
plum
powderblue
purple
rebeccapurple
red
rosybrown
royalblue
saddlebrown
salmon
sandybrown
seagreen
seashell
sienna
silver
skyblue
slateblue
slategray
slategrey
snow
springgreen
steelblue
tan
teal
thistle
tomato
turquoise
violet
wheat
white
whitesmoke
yellow
yellowgreen
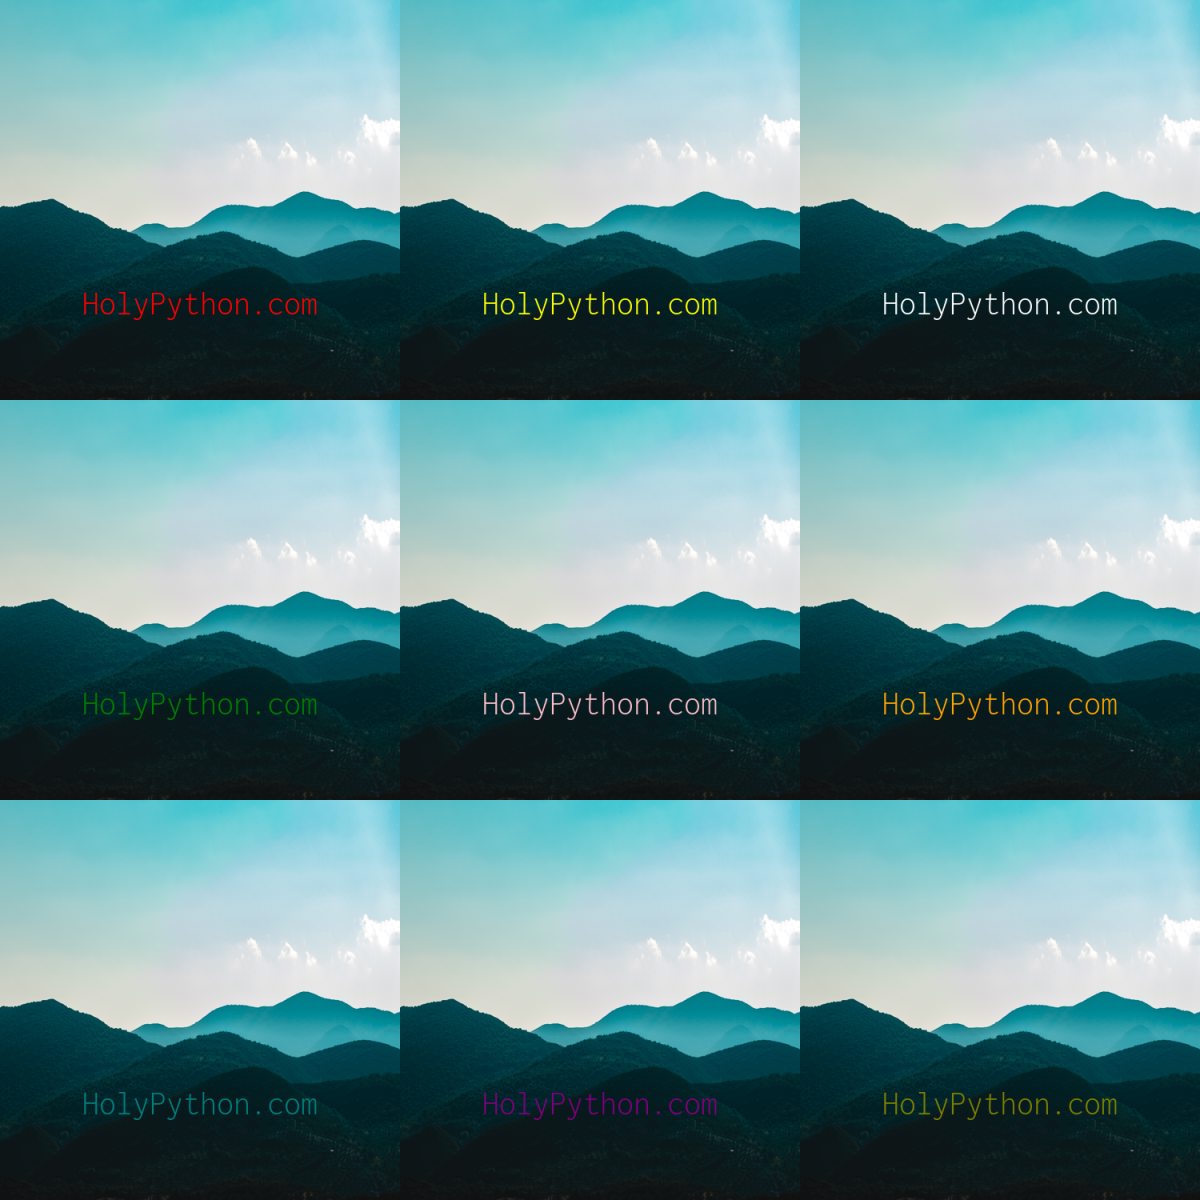
Adjusting Text Color
Adjusting the color of the text being added to the image is also very simple. Just use fill argument and pass a built-in color name or a hex color code to this optional argument when using the draw function.
draw.text((140, 100), text, fill='black')
img.show()

Using draw.text() method from ImageDraw module.
Example 1: Font Size and Type
So far we covered a minimalist Python implementation to add text on images which can be achieved with a few lines of Python code. Our code up to this point uses whatever default font and font size can be recalled by the pillow library since we didn’t assign any specific font settings.
However, there can be many merits to defining a specific font type and a font size while using the draw function to add text to an image or a manipulate batch of images.
text="Hello World!"
font = ImageFont.truetype('Inconsolata-Light.ttf', 162)
draw.text((1240, 1600), text, font=font, fill='white')
img.show()
With proper image and font style the result looks a lot more appealing already.
Managing Fonts for Python PIL - (Linux)
A quick font file explanation might be useful here. We are using Inconsolata-Light.ttf that’s already installed in our Linux system.
If you are using Linux, you can check out the available fonts installed in your system by running fc-list command in your terminal.
You can simply install new font files by placing .ttf or .otf font files in your system’s /usr/share/fonts directory. Don’t forget to run fc-cache command to refresh your font registry and then you can list available font by running fc-list again.
There are incredibly cool font options for free at Google Fonts. You can also search for specific font styles such as Serif, Sans Serif, Display, Handwriting or Monospace. You can download the font’s zip file and then extract it in your operating system.
Managing Fonts for Python PIL - (Mac OS & Windows)
Users of Mac OS operating system can use the terminal to manage fonts although the Font Book software makes it a breeze to install new fonts to the system and all the user has to do is click install font after opening a new font file.
Similarly, Windows users can open the Font tool under Settings > Control Panel where they can see, list, manage, install and uninstall new font files.
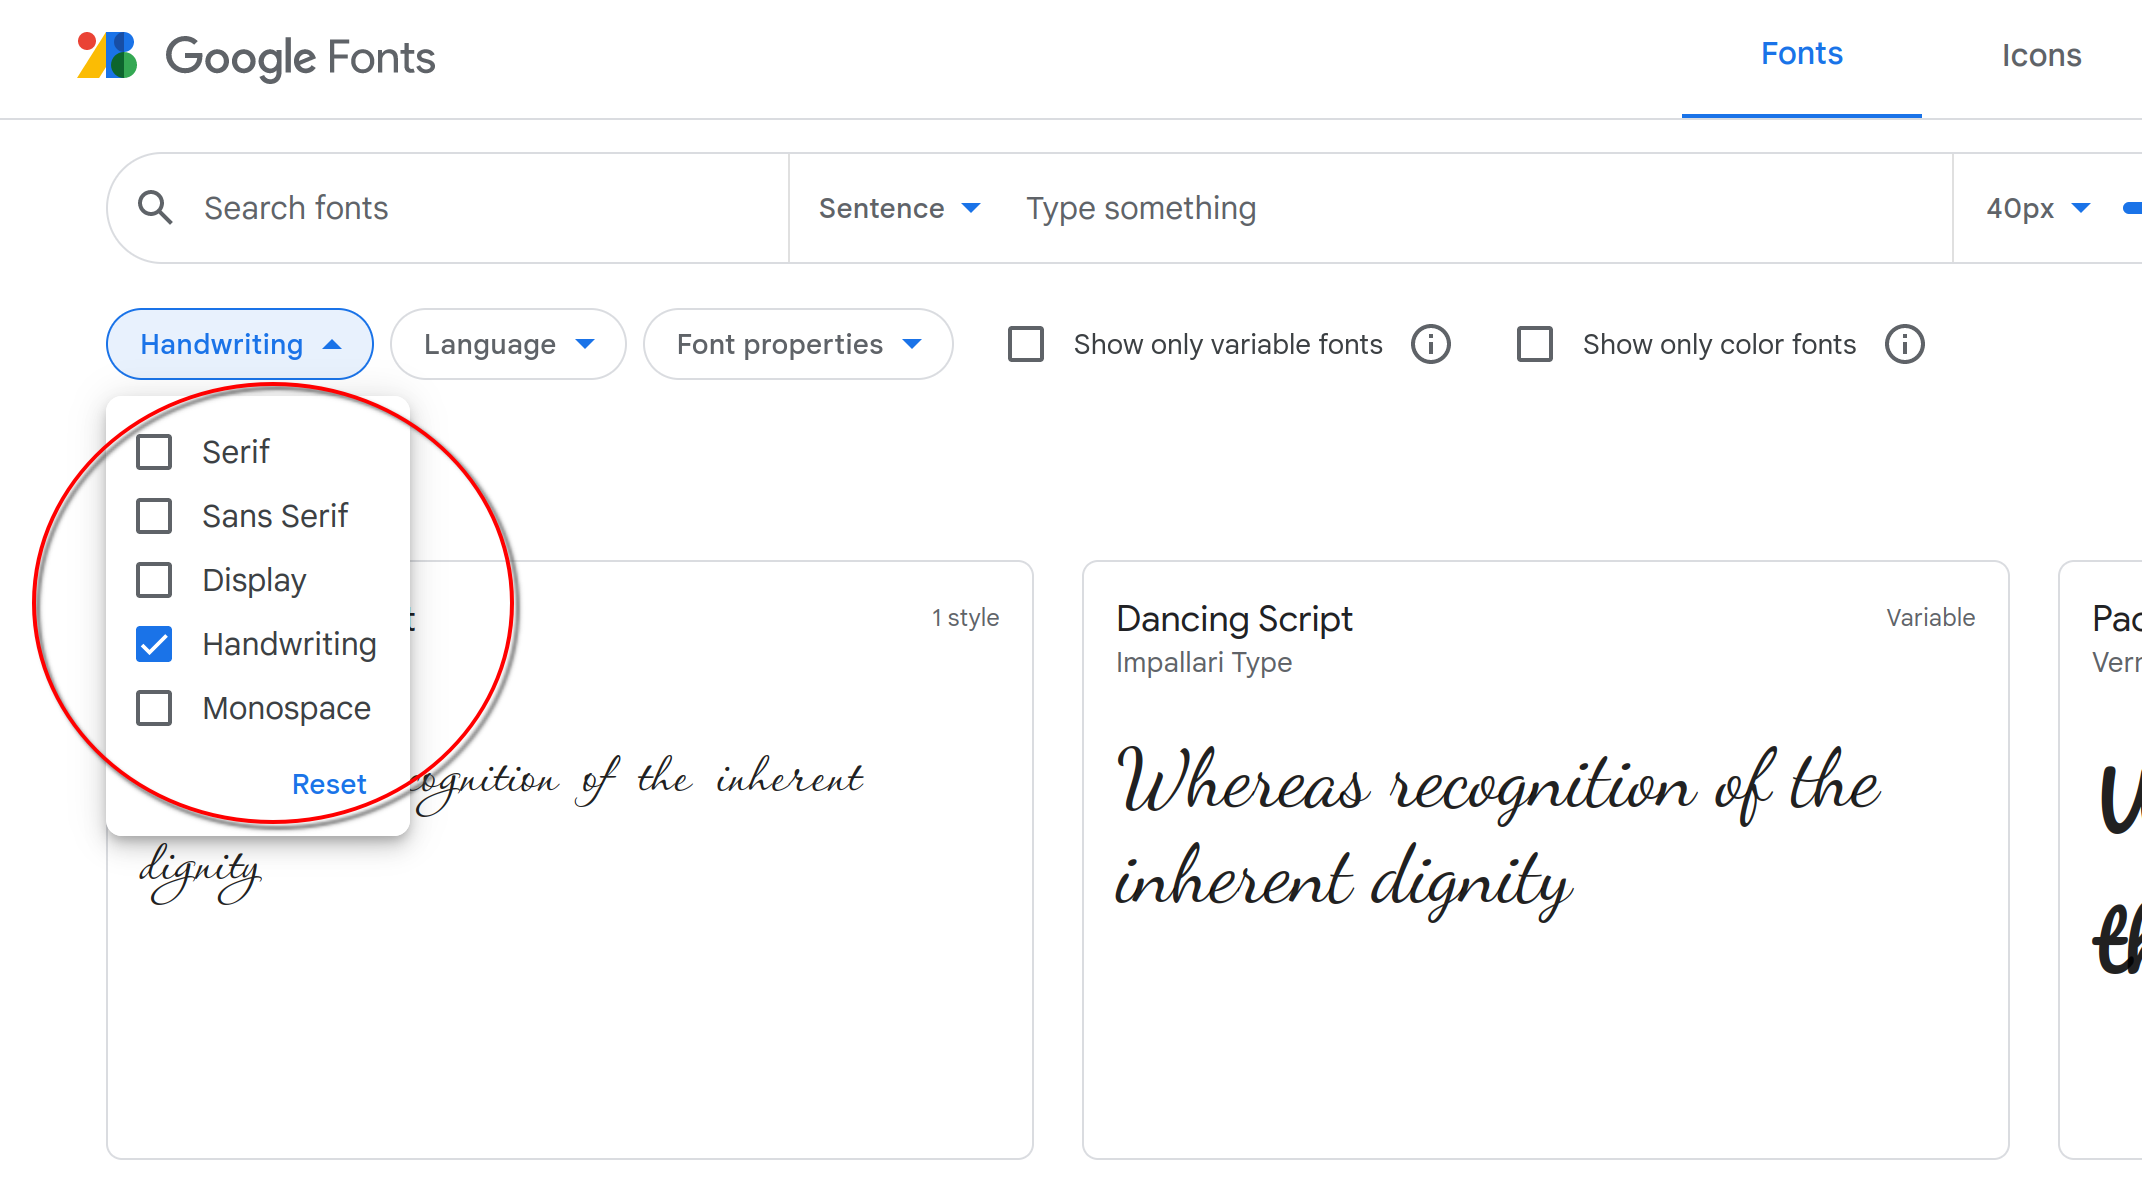
You can filter font categories: Serif, Sans Serif, Display, Handwriting, Monospace
You are free to install new fonts however, you can also just extract your fonts to a specific local folder and then specify that font’s full directory in the PIL code as well. Both ways should work fine.
Here is a quick explanation of font families:
- Serif: Serifs are the little pieces and tails attached to characters in a font. Serif font families appear authoritative and give a classic look to your text. They can be suitable for literature, legal and professional content.
- Sans Serif: Sans means “without” in French and Sans Serif are modern font families that give text a sleek, minimalist and modern look. Sans Serif fonts can be useful for tech, computer science, sports, fashion, gaming and any other content where author wishes to have a modern look.
- Handwriting: Self-explanatory handwriting fonts can be used for decorative text elements.
- Display: Display fonts are suitable for large size applications such as posters and big displays, big slogans, big titles etc.
- Monospace: Every character has the same width. Useful for environments without graphic servers such as computer terminals.
This is a quick rundown of font families and of course you can mix and match different font families and get as creative as you wish with fonts.
Here is a Python – PIL code that utilizes three different fonts in harmony: Cantarell VF, Inconsolata Light and Sacramento Regular.
file_dir='/home/usa/Downloads/Wallpaperz/'
file_name='billy-williams-8wz1Q4Q_XAg-unsplash.jpg'

img = Image.open(file_dir+file_name)
draw = ImageDraw.Draw(img)

text1 = "100"
text2 = 'Python'
text3 = 'Tips & Tricks'

font1 = ImageFont.truetype('Cantarell-VF.otf', 280)
font2 = ImageFont.truetype('Inconsolata-Light.ttf', 280)
font3 = ImageFont.truetype('Sacramento-Regular.ttf', 280)

draw.text((140, 100), text1, font=font1, fill='black')
draw.text((540, 120), text2, font=font2, fill='gray')
draw.text((140, 520), text3, font=font3, fill='yellow')

img.show()
And here is the result:
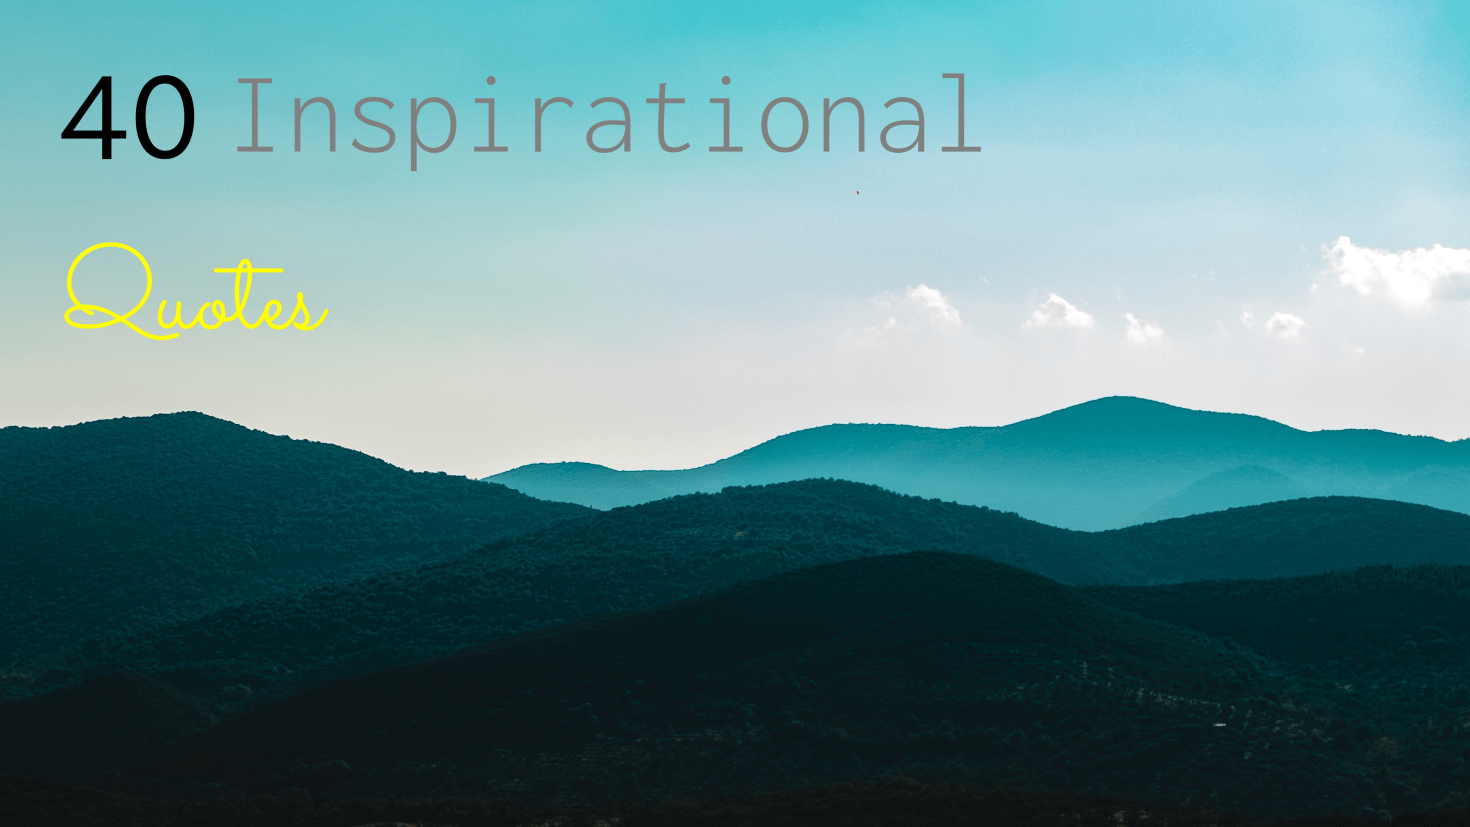
Image credit: Billy Williams @Unsplash
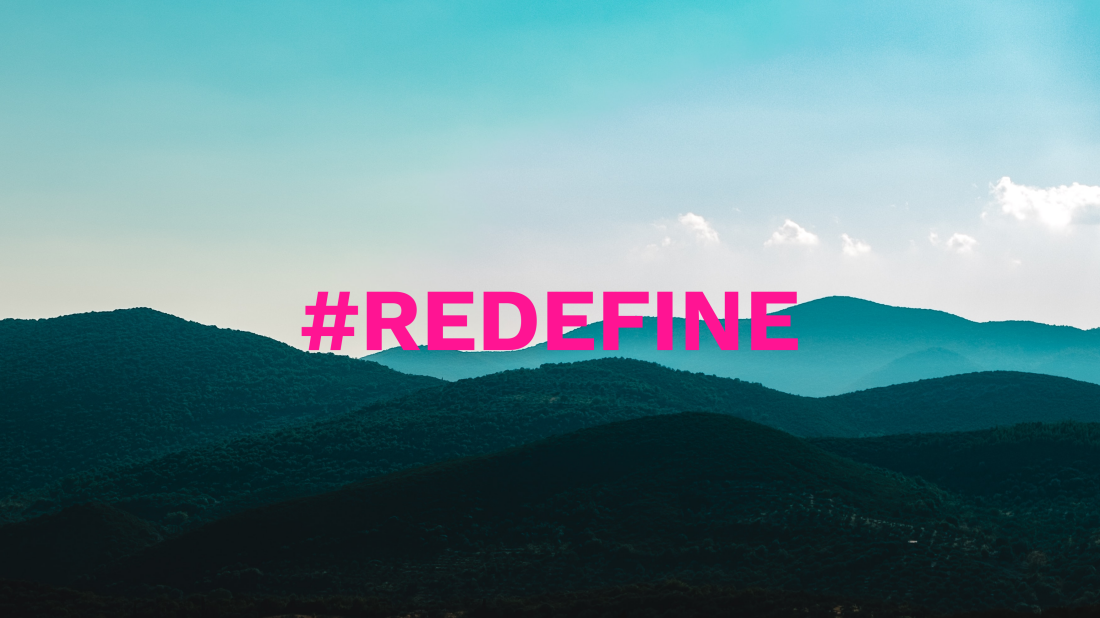
Example 2: Text Position
Sometimes, especially when working on scale, you might want to use dynamic positioning instead of providing manual text coordinates.
.size method in PIL with Python. For example img.size would return two values; the width and the height of the image.Here is an example where Python code takes the coordinates of text to be placed on the image dynamically based on the image’s 2-dimensional size values.
x, y = img.size
print(x,y)
3502, 1970
text = "Sustainability\nReport 2023"
font = ImageFont.truetype('WorkSans-Regular.ttf', 282)

textwidth, textheight = draw.textsize(text, font=font)
print(textwidth, textheight)
1866, 530
from PIL import Image, ImageDraw

img = Image.open(mountain.png)
font = ImageFont.truetype('WorkSans-Bold.ttf', 282)
text = "#REDEFINE"
draw = ImageDraw.Draw(img)

textwidth, textheight = draw.textsize(text, font)
width, height = img.size
x=width/2-textwidth/2
y=height/2-textheight/2

draw.text((x, y), text, font=font, fill='DeepPink')
img.show()
Example 3: Rotating Text
We can also create rotated text at any angle. The recipe to do that is to create a transparent image first. Write the text on that image and rotate that image.
Then we can paste that rotated image (which will also rotate the text on it). Then we can paste this image on another image using the paste method.
Below, you can find a step by step implementation of rotated text with Python and the full Python code example.
from PIL import Image, ImageDraw, ImageFont
img = Image.open(mountain.png)
x, y = img.size
txt_layer = Image.new("RGBA", (y, x), (255, 255, 255, 0))
Then we can create a draw object on this text layer we created. We can write our text which will end up with vertical orientation. Another point here is that the y values will define the margin between the text and the right side of the image (in this case it is 50 pixel, see below.)
draw = ImageDraw.Draw(txt_layer)
draw.text((100, 50), "ESG Assets Under Management", font=font, fill=('orangered'))
draw.text((1220, 50), "tel: 212 563 90x8", font=font, fill=('white'))
We can now rotate the image with the text. .transpose() method can be useful for that. Additionally, 270 degrees is required for the result we are looking to achieve which can be implemented with Image.ROTATE_270 object which goes inside the .transpose() method. We will then have a rotated text.
Final step is to merge the layer with rotated text and the actual image. We can use the alpha_composite method since both layers (or images in this case) have the same dimensions.
You can visit our pasting, merging, combining images with Python tutorial to see a lot more technical details about the alpha_composite method and its alternatives.
flip_img = txt_layer.transpose(Image.ROTATE_270)
new_img = Image.alpha_composite(img, flip_img)
new_img.show()
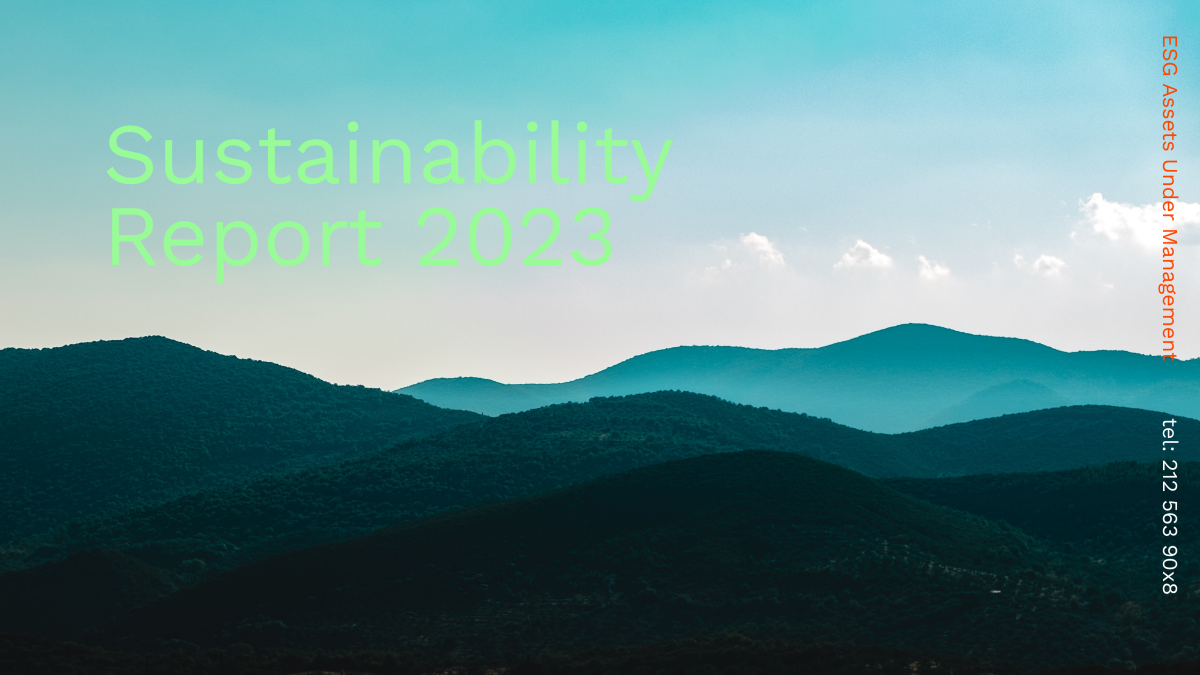
Here is the full Python code.
* This code is missing the part about the title text which can be implemented with the previous sections of this tutorial.
from PIL import Image, ImageDraw, ImageFont

img = Image.open(mountain.png)

x, y = img.size
txt_layer = Image.new("RGBA", (y, x), (255, 255, 255, 0))

font = ImageFont.truetype('WorkSans-Regular.ttf', 62)
draw = ImageDraw.Draw(txt_layer)
draw.text((100, 50), "ESG Assets Under Management", font=font, fill=('orangered'))
draw.text((1220, 50), "tel: 212 563 90x8", font=font, fill=('white'))

flip_img = txt_layer.transpose(Image.ROTATE_270)
new_img = Image.alpha_composite(img, flip_img)
new_img.show()
Example 4: Text Transparency
We can achieve transparent text by a similar technique to text rotation.
If you draw a text with transparent color and directly apply it to the image it will lose transparency.
from PIL import Image, ImageDraw, ImageFont

img = Image.open('mountain.png').convert("RGBA")

text = "Sustainability\nReport 2023"
font = ImageFont.truetype('WorkSans-Regular.ttf', 282)

x, y = img.size
txt_layer = Image.new("RGBA", (x,y), (255, 255, 255, 0))

draw = ImageDraw.Draw(txt_layer)
draw.text((300, 900), text, font=font, fill=(2,157,229, 130))

new_img = Image.alpha_composite(img, txt_layer)
new_img.show()
Example 5: Text filled with patterns or images
You can fill your text with the reef pattern for instance.

or stunning fall foliage.

To learn how to create design elements like above using Python, you can visit our tutorial: How to crop images in text shapes using Python.
Image Grids with Text
Finally, to create an image grid with text objects similar to the one near the headline of this Python tutorial, you can refer to our tutorial about creating Image Collages with Python.
show() vs save() Showing and/or Saving Python images
When we use .show() method, a temporary .png file gets displayed by the default image opening application on the computer. If there is no such application the graphic server might default to the default browser as well as browsers are capable of opening images.
Once you close the image this temporary .png file gets removed automatically which is convenient if you are making a series of tests and have no interest in keeping these images.
.save() method can be used alternatively to view as well as keep these image files after image editing takes place. .save() method’s usage is very simple. Simple use it on the image that needs to be saved and pass the file name (optionally with the full directory) as a string inside it. For example:
img.show()
If you are using Windows, you might need to experiment with backslash or even double backslashes because single backslash needs to be escaped during the Python source code interpretation and raw string usage might also be useful. Check out this alternative directory format for Windows users:
For Windows:
img.save(r"C:\\Users\\HP\\Documents\\Cover.jpg")
We are using raw string for Windows. Windows directory structure is a bit complicated and you might need to play around with double slashes back/forward slashes etc..
For Linux you can just use regular slash in your full path.
For Linux:
img.save("/home/HP/Documents/Cover.jpg")
You can also visit our Open, show, save images with Python tutorial.
Benefits of adding text on images with Python
Compared to image editing software, adding text using Python has quite a few fundamentally advantageous benefits.
- Speed: While image editing software takes up lots cpu and memory resources, they will still freeze and hang even on the most powerful computers from time to time. Python PIL library usually doesn’t suffer from such shortcomings and handles image operations at blazing speeds. Furthermore, image editing software such as GIMP or Adobe Photoshop loads up tons of modules and files which you might not need to the memory during startup. If your code is ready, you might be able to apply it to 1000 images during the time image editing software is loading up at startup, that’s true power!
- Scalability: Once you got your Python script coded to perfection you can apply it to thousands or even millions of images. All you have to do is acquire the images and create a for loop or while loop to apply the same text-on-image technique to all of the images you need.
- High-degree of freedom: What image editing software offers is a user interface that allows you to choose, click and drag objects and execute image editing tasks through buttons and windows. Although it can be convenient, there can be many limitations of this approach. Basically you will be limited by the limits implied by the creators of such software whereas while using Python you are free to edit the image to the absolute basics including the tiniest details at pixel level or regarding various image formats and modes. When you have such pixel-level control of an image, if you can imagine an image editing task you can likely achieve it using Python programming.
- 100% Free: Despite its many benefits, Python programming language is completely free (Excluding electricity cost and depreciation of hardware) whereas image editing software can come with hefty license costs or even subscription fees that can make it difficult for students and entrepreneurs to freely get them.
- More fun & educative: Programming image manipulation tasks is lots of fun with Python. Moreover, you end up excelling your basic programming skills so it can also be seen as a personal investment and a practice to acquire high-value, high-income skills.
Summary
In this Python Tutorial we learned how to add text to images.
We demonstrated this tutorial with the most simplistic example first. After that we elaborated on various different text-related adjustments including adjustment of text size, text color, text position, text transparency, rotated text, horizontal and vertical aligning, font size, font type and font style using the Python programming language.
Moreover, we included a number of elaborate examples to demonstrate creative opportunities for using text placements on images in a programmatic way.
If you’d like to explore something different you can check out Holypython’s programming tutorials under other sections such as: