In this tutorial we will take a closer look at PIL module and discover some of its powerful features. You will be able to understand some image manipulation methods with Python including basic editing options such as crop, save, resize etc. and some amazing filter options.
Holy Python is reader-supported. When you buy through links on our site, we may earn an affiliate commission.
Used Where?
Image manipulation
Editing images
Drawing objects on images
Placing text on images
Filtering images
Opening / copying / saving images
Converting images
Pixelizing images…
Let’s start with importing the PIL library:
import PIL
NAME
    PIL - Pillow (Fork of the Python Imaging Library)

DESCRIPTION
    Pillow is the friendly PIL fork by Alex Clark and Contributors.
        https://github.com/python-pillow/Pillow/
Estimated Time
25 mins
Skill Level
Upper Intermediate
Modules
Image, ImageFilter, ImageEnhance, ImageDraw
Libraries
PIL
TUTORIAL
help(PIL)
Image Manipulation with Python using PIL module
If we look at the Package Contents, you can see that there are tons of features. We will look closer at Image and discover its capabilities.
At this point you are ready to open an image file. All you need is to assign an image path and then open it with Image using:
Image.open(f)
where f is the path.
f = r'c:/Users/t/Desktop/IMG_5510.jpg'
img = Image.open(f)
Now, img is your image. If you print it you will get a memory address similar to what happens when your print some builtin functions in Python such as: filter, map, range and zip.
print(img)
--PIL.JpegImagePlugin.JpegImageFile image mode=RGB size=1280x960 at 0x12E16610F60--
Now, img is your image. If you print it you will get a memory address similar to what happens when your print some builtin functions in Python such as: filter, map, range and zip.
To open the image all you have to do is use the .show() method.
img.show()
Showing image with PIL
So now that you have an image in your program, what’s next?
A good idea is to discover all the options using help() function. Also keep in mind that you can use powerful Python basics such as for loops or while loops to edit or create batches of image files.
Let’s see what methods will show if we run help on PIL’s Image object.
help(Image)
Here is a summarized list of all the functions you can use with Image object.
Now that we know some of the fundamentals of PIL, let’s try to do some tricks. Using ImageFilter you can apply some awesome filters to your images -with and within Python! But first of all, let’s explain something that can be quite confusing for a beginner.
When applying Image.filter() we will use another object inside the parenthesis.
You can think about it this way. Image.filter() is the method to apply filters to images in PIL. And inside the parenthesis we will use ImageFilter library. This may seem a bit awkward but separating the filters and the method to apply them: .filter() can be helpful to understand it better.
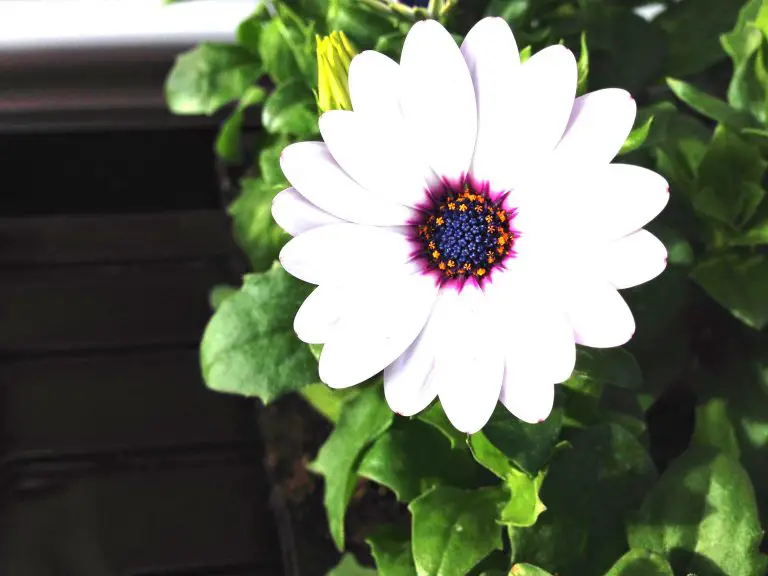
MaxFilter will make darker spots brighter in an image. What it does is, it takes a pixel and searches its neighboring pixels, it replaces the pixel with maximum pixels from the neighbor pixels.
What that means is it will take a pixels and replace it with the brighter pixels surrounding it. This will create an effect that lessens the dark spots. Brilliant isn’t it?
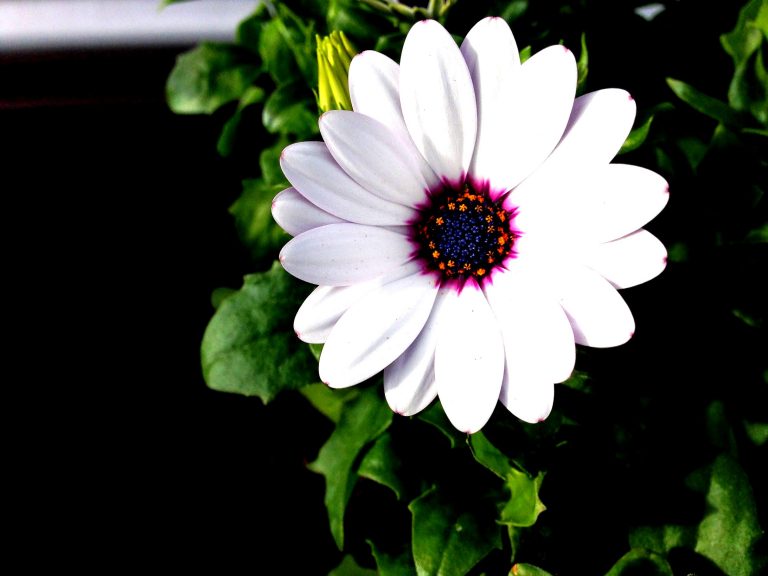
MinFilter is the opposite of MaxFilter. What it will do is take a pixel and search its neighbor pixels and replace it with the minimum value (darker pixel).
This will create an effect that multiplies the dark spots.
Light Pixel Multiplication with MaxFilter in Python PIL
Dark Pixel Multiplication with MinFilter in Python PIL
So, it’s rather simple to apply these ImageFilter filters but where do they come from? How to know which builtin filters we can apply?
Also simple, if you run the help function on ImageFilter you can see all the details about this object. Here is a summary:
An .enhance() value of 1 will apply original colors, 0 will give black&white, 100 will blow out the colors and 0.5 will be half way into a black&white image.
If you’d like to save an image just apply .save() method instead of .show(). Inside the parenthesis you can write the full path but if you just type a name, it will still save to a default folder, typically your c://Users/Name folder.
applier.enhance(2).save("some_name.jpg")
Image.ImageDraw
ImageDraw in PIL (pillow) works similar to ImageFilter and ImageEnhance. First you create a drawing object with the image you’d like to work on and then apply it. Look below:
Drawing a rectangle
import PIL
from PIL import ImageDraw

f = r"c://Users/ABC/0559.jpg"
img = Image.open(f)

Drawer = ImageDraw.Draw(img)
Drawer.rectangle((x1, y1, x2, y2))
Basically, those last two lines are all you need to start drawing on your image.
Let’s explain how the coordinates work in Drawer.rectangle which can be a bit confusing sometimes. And let’s also look at some of the parameters that can make your drawing object more defined such as color and thickness.
x1 is how far you’d like to start from the left side
y1 is how far you’d like to start from the top
x2 is how far you’d like to go to the right
y2 is how far you’d like to go to the bottom
coordinates are written in that order: (x1,y1,x2,y2)
This is similar to drawing a rectangle in Paint or many other image editors. If you remember you start drawing from the top left (x1, y1) and you finish at the bottom right (x2, y2).
Here are the codes used to create this rectangle on this image:
We suggest you to use a proper IDE such as Spyder or PyCharm for this tutorial so you can take advantage of smart completion features of the parameters and arguments. Also showing the image will be more convenient since you won’t need to take any additional steps. In Jupyter you will need to import image displaying libraries from IPython to do this.
Closing, we hope you enjoyed this tutorial. Image manipulation can be a lot of fun and offers great power. Using Python and PIL library it’s also more straightforward than ever.