Python Tips & Tricks (Part III)
Advanced Level
HolyPython.com
Here are more Python tips about relatively more complex Python concepts.
71) Annotated Assignment Statement: (:)
This might not seem as impressive as some other tricks but it’s a new syntax that was introduced to Python in recent years and just good to be aware of.
Annotated assignments allow the coder to leave type hints in the code. These don’t have any enforcing power at least not yet. It’s still nice to be able to imply some type hints and definitely offers more options than only being able to comment regarding expected types of variables.
Check out some of these examples:
day: str = 'Saturday'
print(day)

lst: list = [1,2,3]
print(lst)
'Saturday'
[1,2,3]
The slightly less cool and older implementation would be like this:
day= 'Saturday' #str
print(day)

lst= [1,2,3] # list
print(lst)
You can read Python Official Documentation about Annotated Assignments here.
72) Yield Statement: ()
You can think of yield statement in the same category as the return statement. The difference is, while return statement returns a value and the function ends, yield statement can return a sequence of values, it sort of yields, hence the name.
If you’re interested in algorithms, here is a nice demonstration of Bubble Sort Algorithm Visualization where you can see how yield is needed and used.
Also, here are a couple of examples with yield statement:
def f1(a):
    yield a
    yield a**2
    yield a**3

print (f1(5))

for i in f1(5):
    print (i)
<generator object f1 at 0x00000275EF339AC8>
5
25
125
def f2(b):
    for j in range(b):
        yield j

for i in f2(5):
    print(i)
0
1
2
3
4
73) News brought to you by: (Python Newspaper)
Another fabulous Python library newspaper3k gives a whole another meaning to newspaper access.

You can install newspaper3k via pip from your Anaconda Command Prompt. If you need more instructions you can check out this article regarding how to install packages using pip with Anaconda.
pip install newspaper
After installing newspaper3k you can start using it. Here are some examples:
import newspaper

paper = newspaper.build('http://theatlantic.com')

for article in paper.articles:
    print(article.url)
Code above will list all the articles found in the entire newspaper.
Check out the code below to see all the other attributes you can conveniently extract from a single article or a whole newspaper.
Information is power, when managed well it can offer great contributions to specific tasks, projects and objectives.
from newspaper import Article

url = 'https://www.theatlantic.com/ideas/archive/2020/06/daca-activism/613213/'
article = Article(url)

article.download()
article.parse()


print(article.text)
print(article.authors)
print(article.publish_date)
print(article.images)
print(article.title)
print(article.tags)
print(article.summary)
You can see the Github repository of this cool Python library here: Newspaper 3k Github
74) Geopy: (Work on Open File)
Geopy is another great library that can be used for geocoding services. Converting open addresses to longitude and latitude values or converting coordinates to addresses is called geocoding. It’s a common application with almost any location related service such as media sharing, social network, navigation, transportation, streaming, gaming, websites, communication, identification, security etc.
Here are some simple examples to demonstrate what you can quickly do with geopy library using the address of New York rooftop bar 230 Fifth.
Please note that you might need to change the user_agent to avoid application errors. One common error related to user_agent is InsufficientPrivilege Error.
from geopy.geocoders import Nominatim
geolocator = Nominatim(user_agent="HiApp")
location = geolocator.geocode(" 230 Fifth Ave, New York")

print(location.address)
230, Fifth Avenue, Sheridan Meadows, Amherst Town, Erie County, New York, 14221, United States of America
print((location.latitude, location.longitude))
(42.983481438214326, -78.70683044449504)
print(location.raw)
{'place_id': 259174015, 'licence': 'Data © OpenStreetMap contributors, ODbL 1.0.
https://osm.org/copyright', 'osm_type': 'way', 'osm_id': 12316939, 'boundingbox':
['42.983431438214', '42.983531438214', '-78.706880444495', '-78.706780444495'],
'lat': '42.983481438214326', 'lon': '-78.70683044449504', 'display_name': '230,
Fifth Avenue, Sheridan Meadows, Amherst Town, Erie County, New York, 14221,
United States of America', 'class': 'place', 'type': 'house', 'importance': 0.511}
Open Street Map’s Nominatim is a very convenient geocoding service but you should check their official documentation for any serious use case.
Some other similar web services are Geonames, Yandex Map API, Bing Map API, Google Maps API V3 and Yahoo BOSS Finder. They all offer different usage benefits.

75) sh: (Shell scripts and bash commands)
sh is a subprocess wrapper that can be used to dynamically map system functions to Python. It facilitates writing shell scripts with bash features.
Unfortunately latest version of sh only works for linux and Mac. If you’re using Windows you’ll need to install an old version that can be found here.
Let’s check out some examples of what can be done with sh:
import sh
sh.google_chrome("http://google.com”)
Here are some other ideas:
import sh

sh.whoami()
sh.pwd()
sh.mkdir('foldername')
sh.touch('filename.txt')
sh.echo('Hello World')
76) Decorators: (Augmenting functions without modifications)
Decorators are another elegant representative of Python’s expressive and minimalistic syntax.
By using decorators you can change a function’s behavior or outcome without actually modifying it.
In other words decorators decorate functions to make them fancier in some way.
A decorator starts with @ sign in Python syntax and is placed just before the function.
Here are some simple examples:
Let’s say we have a simple function that adds 2 numbers.
def adder(a, b):
    return a+b

print(adder(2, 3))
5
Now, without touching the original function, let’s decorate it so that it multiplies the result by 100.
def decoten(func):
    def times10(x, y):
        return func(x*10, y*10)
    return times10

@decoten
def adder(a, b):
    return a+b

print(adder(2,3))
50
77: Memory Optimization: (__slots__)
At the advanced level Python can have
When you start editing default Python implementations for speed and efficiency reasons you know you’re starting to get into the expert territory.
Python classes utilize dictionaries for instant attributes by default which can take quite a space even when you’re constructing a class object.
When this is the case you can use __slots__ magic to force Python not to have a big chunks default instance attribute dictionary and instead have a small custom list. This can save lots of memory in suitable applications.
On top of that, another benefit of __slots__ is faster access to class attributes.
Real Madrid : 5
class Team:
    __slots__ = ["name", "score"]
    def __init__(self, name, score):
        self.name = name
        self.score = score


a=Team("Real Madrid", 5)
print(a.name, a.score, sep=" : ")
78) Time it: (Time Processes)
timeit library is great for timing Python execution times. Just pass a function in string format to timeit.timeit() method and it will carry out 1 million executions to report the minimum time the code takes.
Its very useful to compare small code pieces and different functions but can be sluggish with big code.
Check out the example below demonstrating the execution time difference between 2 very similar list comprehension methods in Python:
import timeit

lst1='''list(range(1000))'''
lst2='''[i for i in range(1000)]'''

x=timeit.timeit(lst1)
y=timeit.timeit(lst2)

print(x, y, sep="------")
11.646945999999843 ------- 27.643676500000083
timeit library is great for timing Python execution times. Just pass a function in string format to timeit.timeit() method and it will carry out 1 million executions to report the minimum time the code takes.
Its very useful to compare small code pieces and different functions but can be sluggish with big code.
Check out the example below demonstrating the execution time difference between 2 very similar list comprehension methods in Python:
79) Virtual env: (Managing Dependencies)
Virtual Environment lets programmer create a specific environment with different versions of libraries when needed.
When the developer needs only certain versions of modules and libraries because development requires it virtual environment can be a practical solution.
It’s also quite straightforward with Python.
Make sure virtualenv module is installed (Installed by default in Anaconda3)
pip install virtualenvTo create a virtual environment type virtualenv followed by an environment name you’d like:
virtualenv environment1you can also activate and deactivate a virtual environment simply by typing:
activate environment1
deactivate
You’ll need to activate your specific virtual environment before installing a specific module with a specific version. Once you are done working in that environment you can deactivate it and go back to base.
80) Groupby from itertools: (Grouping Python Data)
If you have iterables with elements belonging to different groups, you can use itertools’ groupby method to group them and process items in groups.
Here is an example:
from itertools import groupby

lst = [("car", "Ferrari"), ("car", "Renault"), ("country", "France"), ("country", "New Zealand"), ("fruit", "Kiwi")]

for i, group in groupby(lst, lambda x: x[0]):
    for j in group:
        print ("{} is a {}.".format(j[1], val))
    print()
Ferrari is a fruit. Renault is a fruit. France is a fruit. New Zealand is a fruit. Kiwi is a fruit.
81) Transposing Data: (zip method)
This trick is simple yet genius and can be very useful sometimes.
You can combine zip function and * unpacking notation for *args appropriate objects.
mat = [[1, 2, 3], [1000, 2000, 3000]]
zip(*mat)
[(1, 1000), (2, 2000), (3, 3000)]
82) Working with Zipped files: (ZipFile Library)
As you get more and more proficient with Python, you start experimenting more and more cases. One of these cases is encountering zip files whether it’s data science, game development, finance or scripting, zip files are a very common part of the digital world.
Let’s check out how zipfile library can be a super convenient and quick solution for zip related tasks.
First you can import zipfile as below:
from zipfile import ZipFile
There are many useful methods to be used with zipfile, here are some common ones:
- Open: Opening with zipfile is more like creating a handle to work with. You can open a zip file in 2 ways: read; “r” and write; “w” depending on your use case.
from zipfile import ZipFile

f = ZipFile("myarchive.zip", "r")
f = ZipFile("myarchive.zip", "w")
- Get file names: You can have a list of all the files’ names returned using namelist() method
from zipfile import ZipFile

f = ZipFile("myarchive.zip", "r")
print(f.namelist())
['app.html', 'credits.html', 'app.css', 'auth.css', 'bridge.css', 'history.css', 'd3dcompiler.dll']
- Extract files:
from zipfile import ZipFile

f = ZipFile("myarchive.zip", "r")
f.extractall("directory")
- Read & Write:
from zipfile import ZipFile

f = ZipFile("myarchive.zip", "r")
a=f.read(r"FF/app.html")
print(a)
- Please note that during the write operation zipfile is specifically opened with “w” parameter.
from zipfile import ZipFile

with ZipFile("myarchive.zip", "w") as f:
    f.write("pricelist.txt")
    f.write("deliveries.xls")
83) Time library: (More Time Functions)
Time library provides lots of time related functions and methods and is good to know whether you’re developing a website or apps and games or working with data science or trading financial markets. Time is essential in most development pursuits and Python’s standard time library comes very handy for that.
Let’s check out a few simple examples:
moment=time.strftime(“%Y-%b-%d__%H_%M_%S”,time.localtime())
import time

time_now=time.strftime("%H:%M:%S",time.localtime())
print(time_now)

date_now=time.strftime("%Y-%b-%d",time.localtime())
print(date_now)
21:47:43
2020-Jun-24

84) getsizeof: (Sys Library)
getsizeof() method from Python’s sys library will tell you the size of a Python object in the memory. Let’s see an example:
import sys
a="Paris"
b=sys.getsizeof(a)
print(b)
54
The result is in bytes.
Getsizeof() will give the size of any Python object whatsoever. Range object, byte object, reversed object, list object, dictionary object, list goes on.
Let’s create a huge list and see its size in bytes:
import sys
a=range(1000000)
b=sys.getsizeof(list(a))
print(b)
9000112
Wow, 9MB in memory. Talk about a big list!
85) Named Tuples: (From Collections Library)
Named Tuple is such a sophisticated data type and it lets you create exactly what the name says and more.
Namedtuple is a:
- Light object
- Readable
- Allows creating attributes
- Callable by names
- Comes with object notation
from collections import namedtuple

flights = namedtuple("flight", "price, distance")
US = flights(2000,5000)
Iceland = flights(500,500)
France = flights(1000,1000)

print(France.distance)
86) Animated Charts: (Save as Gif or Mp4)
Visualization is big in Python. Matplotlib is a well-known library for charts but something super fancy and useful for visualization purposes that goes unnoticed is animated charts possibility in Matplotlib Animations.
Although the function itself, which is FuncAnimation module from matplotlib.animation library, is straightforward itself, there are some parameters that can get confusing such as figure itself, update function for animation, saving options such as codecs, fps settings, FFMpegWriter, PillowWriter, saving as gif, saving as mp4 or avi etc.
We have 2 great tutorials that you can check out explaining:

In short a matplotlib animation is created with 2 major pieces:
- Figure –fig here: a figure window (can be initialized as plt.figure)
- Animation function –animate here below: an animation function that continuously updates the figure
For a more detailed walkthrough please visit the individual Python animation tutorials mentioned above.
import random
import matplotlib
import matplotlib.pyplot as plt
from matplotlib.animation import FuncAnimation

fig = plt.figure(figsize=(15,15))

x,y = [], []
index= count()
def animate(i):
    x.append(next(index))
    y.append(random.randint(2,20))
    plt.style.use("ggplot")
    plt.plot(x,y)

ani = FuncAnimation(fig, animate, interval=300)
plt.show()
87) All or any: (or & and Alternatives)
Any & all are similar to or & and.
- Any returns True when at least 1 of the statements is True
- All returns True when all statements are True
Here are some examples:
any([False, False, False])
all([False, True, True])
any([True, False, False])
any([False, False, True])
all([True, True, True])
False
False
True
True
True
88) Recursive Functions: (Functions calling themselves)
Recursion in programming is a very powerful algorithmic phenomenon that helps question to be solved by solving mini pieces of the problem and continuously feeding the answer or solution back to the problem.
Because of this nature, it goes hand in hand with concepts such as iteration (think for loop or while loop), yield statement (in Python), user-defined functions, algorithms.
Recursive programming is a broad subject and it can go well beyond these Python concepts but solving a problem within Python’s syntax and structure can also be infinitely interesting at the micro level.
Let’s look at a commonly known number sequence to demonstrate a simple recursion idea in Python:
Fibonacci number is calculated by adding 2 numbers preceding the current Fibonacci number. When it’s continuously done it gives Fibonacci Sequence:
Fib(n-2) + Fib(n-1) = Fib(n)
So it goes,
0 | 1 | 1 | 2 | 3 | 5 | 8 | 13 | 21 | 34 | 55 ….
Let’s put it in code:
def fibo(x):

    if x <= 1:
        return x
    else:
        return fibo(x-1) + fibo(x-2)

for i in range(40):
    print(fibo(i), end=" || ")
This code will return 1 for fibo(1) and 0 for fibo(0). After that it starts an infinite recursion. fibo(2) is fibo(1)+fibo(0) and fibo(3) is fibo(2)+fibo(1).
0 || 1 || 1 || 2 || 3 || 5 || 8 || 13 || 21 || 34 || 55 || 89 || 144 || 233 || 377 || 610 ||
987 || 1597 || 2584 || 4181 || 6765 || 10946 || 17711 || 28657 || 46368 || 75025 || 121393 ||
196418 || 317811 || 514229 || 832040 || 1346269 || 2178309 || 3524578 || 5702887 || 9227465 ||
14930352 || 24157817 || 39088169 || 63245986 ||
To check out a Python lesson about advanced parameters of print() function you can click the link.
You can also check out this recursive algorithm demonstration with visualization.
89) Cache results with decorators: (Efficient Functions)
There is a great way to cache functions with decorators in Python. Caching will help save time and precious resources when there is an expensive function at hand.
Implementation is easy, just import lru_cache from functools library and decorate your function using @lru_cache.
Here is an example:
from functools import lru_cache

@lru_cache(maxsize=None)
def fibo(x):
    if x <= 1:
        return x
    else:
        return fibo(x-1) + fibo(x-2)

for i in range(50):
    print(fibo(i), end="|")

print("\n\n", fibo.cache_info())
Furthermore, you can also ask for a cache status report using cache_info().
0|1|1|2|3|5|8|13|21|34|55|89|144|233|377|610|987|1597|2584|4181|6765|
10946|17711|28657|46368|75025|121393|196418|317811|514229|832040|
1346269|2178309|3524578|5702887|9227465|14930352|24157817|39088169|
63245986|102334155|165580141|267914296|433494437|701408733|
1134903170|1836311903|2971215073|4807526976|7778742049|
CacheInfo(hits=96, misses=50, maxsize=None, currsize=50)
Hits and misses show cache hits and cache misses that occurred during operation.
Cache hit roughly denotes when a value is looked up in the cache and is found in the cache and cache miss is when a value is looked up but can’t be found in the cache.
Currsize signifies the current size of cache or in other words how many items have been cached, in this case 50, basically all of them, and maxsize is the maximum allowed items allowed to be cached, in this case None because we specified maxsize to be None in the beginning.
90) Textblob: (Sentiment Analysis)
Sentiment analysis is a term used to refer to the techniques that aims to extract sentiments, emotions or tone from a text. With the advancements in computation power and technology and accumulation of text (social media, online books, news, translation of ancient scripts etc.) Natural language processing (NLP) has become a very interesting and significant field in the last decade.
Textblob is a fantastic library that can be used for sentiment analysis and more. Sentiment can be used to tell the features of a text such as tone positivity, subjectivity, objectivity, hopefulness, kindness, explicit language, grammar analysis, translation, spelling check, etc etc.
This method is currently being used by multiple hedge funds to analyze social media and online news to identify trading opportunities and analyze companies, markets, indexes, economies, stocks and commodities.
It can also be used to analyze political stability, global events, crisis management, books, articles, social media profiles and more.
Here is a simple demonstration from a random book:
from textblob import TextBlob

f = r"c://Users/USA/Desktop/asd.txt"
file = open(f, "r", encoding="utf8")
data= (file.read())

blob = TextBlob(data)

b=blob.sentences
print(b[0])
Spending time together is like playing in the anteroom of heaven.
- First TextBlob module needs to be imported
- Then a blob object needs to be created with the text being analyzed
- And you can start sentiment analysis right away after that
- There are already lots of convenient methods and attributes included such as:
- .tags
- .noun_phrases
- .sentiment
- .sentiment.polarity
- .words
- .sentences
- .lemmatize (grouping similar words for analysis based on context)
- .definition
- .correct()
- .spellcheck()
- .words.count()
- .ngrams()
.sentences returns a list of sentences from the text and here we’re printing only the 1st sentence (index 0). Here is what .tags will return:
b=blob.tags
print(b[:5])
[('Spending', 'NN'), ('time', 'NN'), ('together', 'RB'), ('is', 'VBZ'), ('like', 'IN')] b=blob.sentiment
print(b[:5])
Sentiment(polarity=0.0059523809523809494, subjectivity=0.5603174603174603)
Polarity here refers to a sentiment range between -1 and +1, from most negative to the most positive. Subjectivity can take a value between 0 and +1, 1 being the most subjective text possible while 0 signifies maximum objectivity.
Let’s see the last 5 words this time:
b=blob.words[-1:-6:-1]
print(b)
['mountains', 'huge', 'become', 'now', 'love']
And definition of the last word:
b=blob.words[-1].definitions
print(b)
['a land mass that projects well above its surroundings; higher than a hill',
"(often followed by `of') a large number or amount or extent"]
You can also check out this sentiment analysis tutorial with textblob for more examples.
91) Kwargs: (Arguments for named sequences)
**kwargs and *args are function arguments that can be very useful.
They are quite underused and often under-understood as well. (Sorry couldn’t resist that)
Let’s try to explain what kwargs are and how to use them.
- While *args are used to pass arguments at an unknown amount to functions, **kwargs are used to do the same but with named arguments.
- So, if *args is a list being passed as an argument, you can think of **kwargs as a dictionary that’s being passed as an argument to a function.
- You can use arguments as you wish as long as you follow the correct order which is: arg1, arg2, *args, **kwargs. It’s okay to use only one of those but you can’t mix the order, for instance, you can’t have: function(**kwargs, arg1), that’d be a major faux pas in Python.
- Another example: You can do function(*args,**kwargs) since it follows the correct order.
Here is an example. Let’s say satelites are given with their names and weight in tons in dictionary format. Code prints their weight as kilograms along with their names.
def payloads(**kwargs):
    for key, value in kwargs.items():
        print( key+" |||", float(value)*1000)

payloads(NavSat1 = '2.8', BaysatG2 = '5')
NavSat1 ||| 2800.0
BaysatG2 ||| 5000.0
Since the function above would work for any number of dictionary keys, **kwargs makes perfect sense rather than passing arguments with a fixed amount.
Also ** syntax can be used to unpack while calling a function. Check out this example:
def payloads(**kwargs):
    for key, value in kwargs.items():
        print( key+" |||", float(value)*1000)

sats={"Tx211":"2", "V1":"0.65"}
payloads(**sats)
Tx211 ||| 2000.0
V1 ||| 650.0
92) Compile a regex formula: (Advanced Regex)
You can also compile regular expressions in Python.
Regex has a massive place in working with all kinds of text, database queries, strings, search engine queries, tables, web data etc.
Python comes with a standard regular expression library called re. If you’re new to regex and would like to learn more you can check out this extensive:
Python Regular Expression Tutorial
and
Python Regular Expression Exercises (Online & Interactive)
So in this tip we will check out how regex can be compiled and the benefits of doing so.
Normally, when you use a regex expression Python will compile it during the execution of your program and it won’t really make a difference if regex is compiled before hand or not. Especially since Python also caches regular expressions the performance benefits of separately compiling regex is not expected to be significant.
However, some main benefits of compiling regex are reusability and readability.
On top of that it can make sense to compile some regex expressions ahead of execution so that compilation is not done at a random or even worse critical moment when running the program.
Check out this simple example to understand how regex can be compiled in Python:
Regular Expression without compiling:
import re

str='''Chuck Norris can divide by zero.
When Chuck Norris falls in water, Chuck Norris doesn't get wet. Water gets Chuck Norris.
Chuck Norris once visited the Virgin Islands. They are now The Islands.'''

result2 = (re.match('[A-Z][a-z]*\s\S*', str))
print((result2))
Regular Expression Compiled Example:
import re

str='''Chuck Norris can divide by zero.
When Chuck Norris falls in water, Chuck Norris doesn't get wet. Water gets Chuck Norris.
Chuck Norris once visited the Virgin Islands. They are now The Islands.'''

query = re.compile('[A-Z][a-z]*\s\S*')
result1 = (query.match(str))

print((result1))
93) Create a File Server: (A Surprising One Liner)
This one is kind of well-known. Still very impressive nevertheless.
At the comfort of your command prompt (we recommend Anaconda Prompt), you can create an HTTP server with a tiny one line Python command like below:
python -m http.server 8000
Number in the end here is the Port Number.
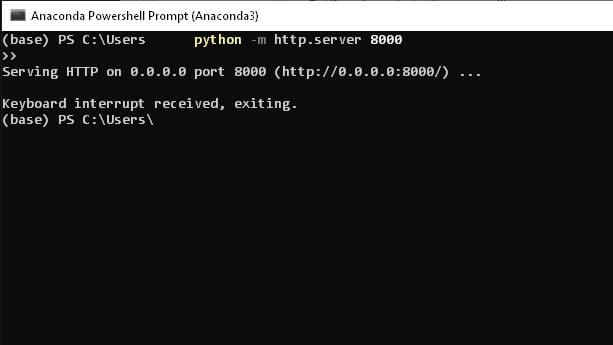
Server will start immediately. If you’d like to kill the server just pres Ctrl+C and server will be interrupted as above or you can just close the Prompt Window.
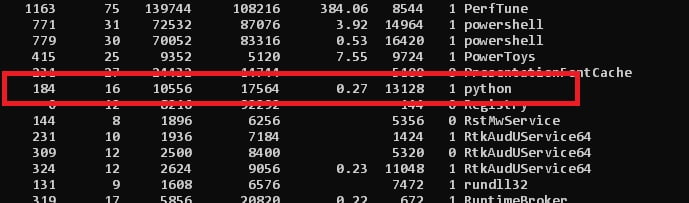
If you’d like to make sure you can type ps from the Command Prompt to see all the processes. Scroll up to P and you will see a Python process when the server is running which will be shut down after you stop the server.
Please note that if you have other instances of Python running such as Spyder or any Python IDE or Python itself, these processes will also appear under Python in the list.
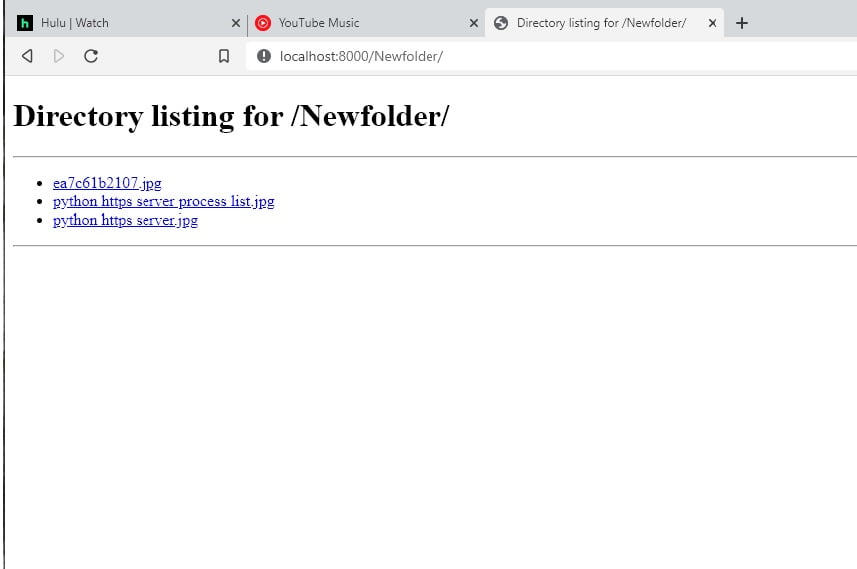
- You can access you Python file server by navigating to localhost:8000 (Or whatever port you chose) from your browser’s address bar.
- It’d be wise to open the server on a dedicated not-so-important folder somewhere in your computer. i.e.: You can create a new folder on your desktop, navigate to that directory using cd command and start the server within there.
94) Enum Class: (Members with unique ID values)
Here is another classy approach from Python, no pun intended. Python’s enum class will let you create enum object members with constant and unique values which then can be listed, compared or used for identification.
Enum classes are also iterable so they can be iterated as well:
Here is a simple example:
from enum import Enum

class sports(Enum):
    skiing = 0
    soccer = 1
    running = 2
    football = 3
    golf = 4
    swimming = 5


print(sports.golf)
print(repr(sports.golf))
sports.golf
<sports.golf: 4>
Python enum class iteration example:
for i in sports():
    print(i)
<sports.skiing: 0>
<sports.soccer: 1>
<sports.running: 2>
<sports.football: 3>
<sports.golf: 4>
<sports.swimming: 5>
95) Connect to Database: (SQLite)
Database is such a powerful concept to store data. Apps use it, software uses it, websites use it. It’s not that hard and you can also use it.
But then when you combine Database programming with Python, that’s real power.
SQlite is a nice open-source application that works well with Python.
All you need to do is type a few Python codes and implement your SQL code inside. It will be something like this:
import sqlite3

q = sqlite3.connect('Mydatabase.db')
cursor = q.cursor()

cursor.execute('SELECT id, name FROM Prices')
data = cursor.fetchall()
for i in data:
    print(i)

cursor.close()

q.close()
- First connect to database via sqlite3 (sqlite3.connect(‘Mydatabase.db’))
- Create a cursor (q.cursor())
- Then, cursor.execute for executing Database Commands.
- .fetchall() to get data from the Database Rows
- Finally close the cursor and terminate the connection (cursor.close() and q.close())
96) StringIO, cStringIO and BytesIO: (Python Streams)
These very potent, practical but unused methods can mean the difference between hardcore performance and inefficient operations.
Generally Python stream is a file-like object that exists in the Ram of the computer instead of the Disk IO. Ram is much faster than Disk and can be perfect for parts of the program that’s running.
That’s why lots of software has some kind of Ram usage and you can implement it too.
- StringIO is used with unicode objects (like strings) and it will accept any string with Unicode encoding
- BytesIO is used with byte data (binary input)
- cStringIO is like StringIO since it’s a C implementation but there is a catch, cString won’t accept any string that can not be encoded as plain Ascii, which can be limiting depending on the situation.
import StringIO

str = "Hello World"
file = StringIO.StringIO(str)

print (file.read())
Hello World
97) Work with gzip files in Python: (gzip library)
Gzip or gnu is a compression algorithm that can provide lots of compression benefits with large files. You might have seen it before as a file which uses .gz extension. Since gzip only works for a single file you might also have seen the tar archive solution which combines multiple files before creating gzip compression resulting in a tar.gz (or tgz) file.
Python has a great gzip library that makes working with gzip files a breeze.
Here is a super simple demonstration of compressing a Python list:
import gzip

str = b"Hello World"
c_str = gzip.compress(str)
That was too easy because our string was in byte format already b””.
Because compress() method takes byte data only. So, sometimes you might need to make that conversion but it’s not that complicated once you know it.
Here is another example where a regular string is “prepared” for compression:
- First, string is going to be converted to bytes using bytes() function
- And second, “utf8” is passed as encoding parameter in the bytes function.
import gzip
str = "Hello World"
str = bytes(str, "utf8")
c = gzip.compress(str)
print(c)
So, what if you want to compress Python objects such as lists, dictionaries, tuples or files and images. In each case you will need to do appropriate conversions so that data is ready for compression. Here is an idea to compress a list: First it’s converted to string and then compressed. Similar methods can be used with JSON method.
import gzip

lst = ["kiwi","apple","banana"]
lst = str(lst)
lst = bytes(lst, "utf8")
c=gzip.compress(lst)
print(c)
Decompression part is the reverse of a compression process and somewhat more straightforward:
import gzip
dec_lst = gzip.decompress(c_lst)
Finally, you can also use open() method to open gzip files and work with them.
open with structure can also be useful in this case:
with gzip.open("textfile.txt.gz", "rb") as file:
	data = file.read()
98) Memory Management: (getrefcount method)
getrefcount will show how many times an object is used in the memory. It’s a fantastic tool that can be used for memory management in any program and it’s very convenient too.
Getrefcount will calculate the object usage at a low level ByteCode so it can tend to be higher than expected. For instance when you print a value that value is actually processed multiple times in the background inside the print function itself and getrefcount also counts the instance when the value is called with getrefcount method itself. So, it’s safe to say that the count will actually always be at least 1 time higher than expected.
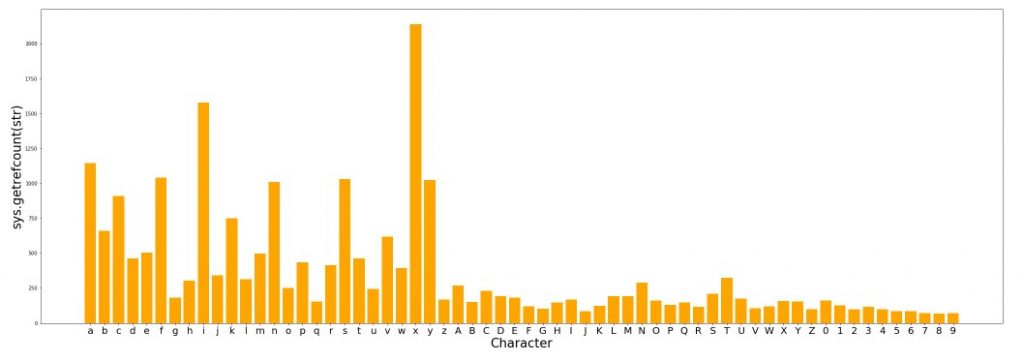
Here is a code to show how many times alphanumeric characters are referenced in a random code:
It makes sense to see that x, i and y are so frequently utilized.
import sys
import matplotlib.pyplot as plt

#string with all character letters
str = "abcdefghijklmnopqrstuvwxyzABCDEFGHIJKLMNOPQRSTUVWXYZ0123456789"
x_ax = [sys.getrefcount(i) for i in str]
y_ax = range(len(str))
Graph = plt.figure(figsize=(250,150))

plt.bar(y_ax, x_ax, align='center', color="orange")
plt.xticks(y_ax, str)

plt.xlabel("Character")
plt.ylabel('sys.getrefcount(str)')

Graph.show()
This code will show reference counts for 2 random variables: First an integer that gets increased by 1, second, a random word that’s not likely to be used anywhere else in the backend of the functions (Heritage).
Interestingly first variable (integer 10) is referenced 309 (minus one) times in the kitchen of this little program. Second variable is never used except our assignment and reference count attempt which adds up to 3 times. Cool trick?
a_val = 10
a_val += 1

b_val = "Heritage"

a = sys.getrefcount(a_val)
b = sys.getrefcount(b_val)

print(a, b, sep="\n")
309
3
99) os.environ: (environment variables)
environ is a very cool module from Python’s default os library.
You can access all environment variables in your operating system using os.environ.
It works in a dictionary format and lists all the variables. Let’s see:
import os
print(os.environ)
Above code will give you a raw and messy output to the human eye. But, you can specify which data you’d like to extract with os.environ as well.
Since it’s in dictionary we can tweak the code a little bit to make everything more readable, also it’s an opportunity to use the pprint library:
{‘ALLUSERSPROFILE’: ‘C:\\ProgramData’,
‘APPDATA’: ‘C:\\Users\\ABC\\AppData\\Roaming’,
‘CLICOLOR’: ‘1’,
‘COMMONPROGRAMFILES’: ‘C:\\Program Files\\Common Files’,
‘COMMONPROGRAMFILES(X86)’: ‘C:\\Program Files (x86)\\Common Files’,
‘COMMONPROGRAMW6432’: ‘C:\\Program Files\\Common Files’,
‘COMPUTERNAME’: ‘DESKTOP-465GJRJ’,
‘CONDA_PREFIX’: ‘C:\\Anaconda3’,
‘DRIVERDATA’: ‘C:\\Windows\\System32\\Drivers\\DriverData’,
‘GIT_PAGER’: ‘cat’,
‘HOMEDRIVE’: ‘C:’,
‘HOMEPATH’: ‘\\Users\\ABC’,
…
‘PROCESSOR_ARCHITECTURE’: ‘AMD64’,
‘PROCESSOR_IDENTIFIER’: ‘Intel64 Family 6 Model 158 Stepping 10, GenuineIntel’,
‘PROCESSOR_LEVEL’: ‘6’,
‘PROCESSOR_REVISION’: ‘gxxa’,
‘PROGRAMDATA’: ‘C:\\ProgramData’,
‘PROGRAMFILES’: ‘C:\\Program Files’,
‘PROGRAMFILES(X86)’: ‘C:\\Program Files (x86)’,
‘Files\\WindowsPowerShell\\Modules;C:\\WINDOWS\\system32\\WindowsPowerShell\\v1.0\\Modules’,
…
‘SYSTEMDRIVE’: ‘C:’,
‘SYSTEMROOT’: ‘C:\\WINDOWS’,
‘TMP’: ‘C:\\Users\\ABC\\AppData\\Local\\Temp’,
‘USERDOMAIN’: ‘DESKTOP-465GJRJ’,
‘USERDOMAIN_ROAMINGPROFILE’: ‘DESKTOP-465GJRJ’,
‘USERNAME’: ‘ABC’,
‘USERPROFILE’: ‘C:\\Users\\ABC’,
‘WINDIR’: ‘C:\\WINDOWS’}
import os
import pprint
print(os.environ)
100) Serialization: (pickle & Json)
Sometimes you may need to save your Python object locally for later use or Network transfers. Python has fantastic libraries for serialization such as Json and Pickle.
Serialization is storing data structures in the program so they don’t just disappear after the program is terminated.
There is also marshal library but it’s more primitive and can’t handle certain techniques such as class instances and recursion. Marshal is closer to json in its scope of serialization.
So, when would you use pickle, cpickle, json or ujson?
cpickle and ujson are faster versions of respective libraries that take advantage of C implementations in Python. So they’d always be favorable for speed reasons.
Apart from that, json is a more secure and readable version of serialization than pickle which comes at a cost of speed.
While you can take care of almost any data structure in Python with Json it gets inefficient with large files or uncommon objects. Pickle on the other hand operates in a sweet spot where you’d like to work with large files (multiple GBs) and still don’t want to be bothered with database solutions.
The thing is depending on your application, you may have to watch out for security vulnerabilities pickle introduces to the system so it’s usually wise to seek out json or database solutions before resorting to pickle when possible.
You can check out our JSON Tutorial explaining JSON solutions in Python.
Here is a quick pickle serialization and deserialization:
import pickle

lst = ["LAX", "LGA", "DEN", "SFO", "JFK", "MIA"]
a = pickle.dumps(lst)

print(a)
b'\x80\x03]q\x00(X\x03\x00\x00\x00LAXq\x01X\x03\x00\x00\x00LGAq\x02X\x03\x00\x00\x00DENq\
x03X\x03\x00\x00\x00SFOq\x04X\x03\x00\x00\x00JFKq\x05X\x03\x00\x00\x00MIAq\x06e.'
print(pickle.loads(a))
['LAX', 'LGA', 'DEN', 'SFO', 'JFK', 'MIA']
Python Tips & Tricks (Bonus Parts)
Various Levels
HolyPython.com
Bonus) Abstract Base Classes: (ABC)
Abstract Classes are nice alternatives to concrete classes since they conveniently allow multiple inheritence.
They work well with unfinished, concept-like classes hence the name abstract. Abstract classes become functional with methods written in subclasses. When a developer is working with subclasses of an abstract class they know that the class is either incomplete or empty so this gives an opportunity to work with incomplete classes in a structured way. @abstractmethod is a useful decorator for abstract base classes in Python.
Here is an example with an @abstractmethod :
from abc import ABC, abstractmethod

class ClassAbstract(ABC):

    def __init__(self, val1):
        self.value1 = val1

    @abstractmethod
    def under_construction(self):
        pass

class DDD(ClassAbstract):

    def under_construction(self):
        return self.value1

data1 = DDD(10)

print(data1.under_construction())
10
While the example demonstrates abstract classes perfectly here are 2 “bad” examples to further elaborate abstract classes:
from abc import ABC, abstractmethod

class ClassAbstract(ABC):

    def __init__(self, val1):
        self.value1 = val1

    @abstractmethod
    def under_construction(self):
        pass

class DDD(ClassAbstract):

    def multiplier(self):
        return self.value1*10

data1 = DDD(10)

print(data1.multiplier())
TypeError: Can't instantiate abstract class DDD with abstract methods under_construction
You get the above error because you didn’t modify and complete the incomplete abstractmethod inherited from the abstractclass.
Let’s look at another troubled example:
In this example, abstractmethod is not enforced. This is only good old inheritence and not an abstractclass. It still works even though under_construction method is left untouched.
from abc import ABC, abstractmethod

class ClassAbstract:

    def __init__(self, val1):
        self.value1 = val1

    def under_construction(self):
        pass

class DDD(ClassAbstract):

    def multiplier(self):
        return self.value1*10

data1 = DDD(10)

print(data1.multiplier())
100
Bonus) c classes: (cPickle, uJson and others)
If you are serious about execution speed then you should definitely consider mingling with C and C++ in relation with Python.
With the help of C extensions some Python operations can be sped up to 100x, 500x or 1000x.
The details of these concepts is beyond the scope of this Python tutorial but if you’re interested you should definitely check out Cython, distutils and setuptools.
Distutils and setuptools make it possible to write extension modules for Python written in either C or Python or even a mix code.
Cython is a Python-like languages that compiles like C catching up with C speeds in many cases.
CPython, often confused with Cython is a Python implementation in C and it requires writing C code for the most part but both will allow you to write libraries in C that can be implemented in Python such as Python’s standard library numpy.
You can also check out alternative libraries that are already written in C by the community. One example to that is uJSON, an ultra-fast alternative to Python’s standard JSON library, or cPickle as an alternative to Pickle.