This is a tutorial about how to write a simple code in Python to show the differences between 2 images.
Although It’s a crude code this can be very useful for practicing fundamental programming skills. You can also find a more elegant approach here. (soon to be published.)
In something like 25 lines of code you can see the demonstration of:
for loops, PIL library usage, manual counter (c), conditional expression (if – else), continue / break statement and data array subtraction (numpy).
Used Where?
Quick styling of matplotlib graphs and charts.
First thing first, let’s get out the Python libraries and make them ready to use:
import numpy as np
import cv2
import PIL
from PIL import Image
from PIL import ImageDraw
Estimated Time
15 mins
Skill Level
Upper Intermediate
Styles
25+
Libraries
PIL, cv2, numpy
Course Provided by
HolyPython.com
TUTORIAL
If we look at the Package Contents, you can see that there are tons of features. We will look closer at Image and discover its capabilities.
At this point you are ready to open an image file. All you need is to assign an image path and then open it with Image using:
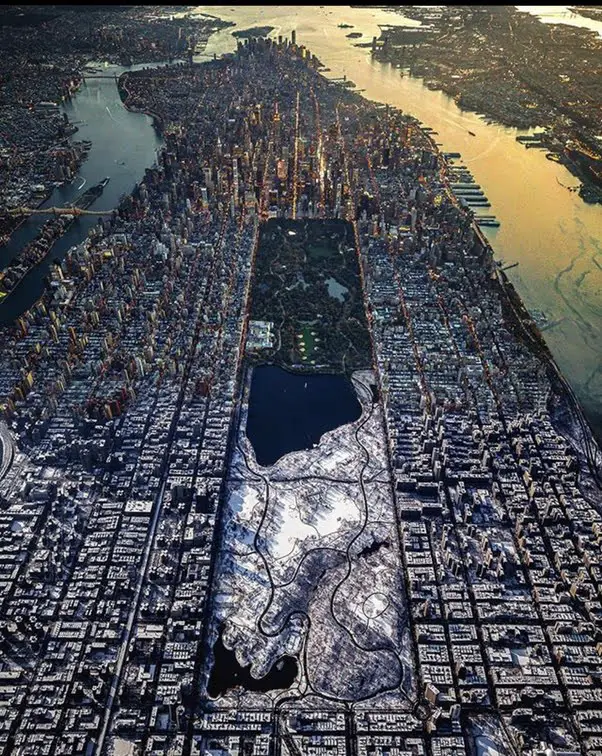
Hudson River (on the right) is the river between Manhattan and New Jersey and the river between Manhattan and Brooklyn is called East River (on the left).
Manhattan Island from above. Hudson River on the right and East River on the left
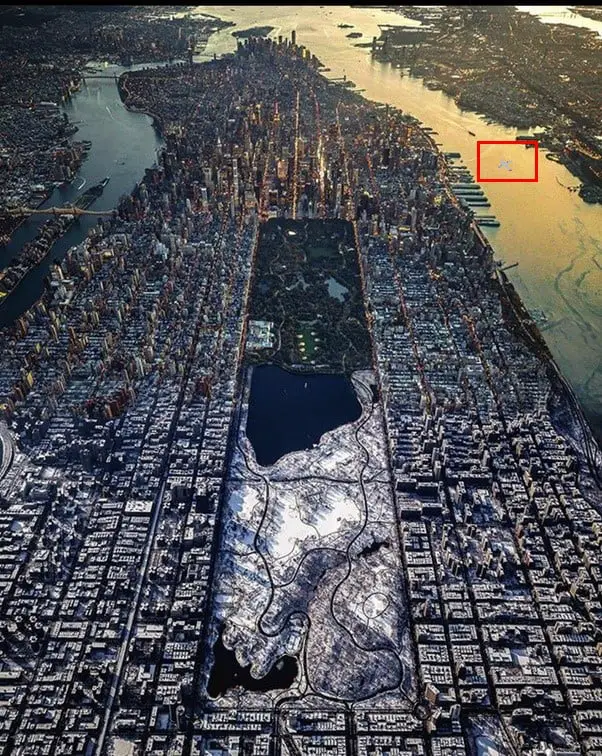
Here is the same image with a tiny difference.
Here is the same image with A320 in it. OK it's not a Picasso painting but can you see it?
On January 15, 2009, some New Yorkers couldn’t believe their eyes as an Airbus A320 descended and smoothly touched down on Hudson River in a matter of a couple of minutes. Plane “rivered” somewhere across 48th Street saving lives of all 155 people on board.
Captain Sullenberger’s heroic achievement was going to be remembered as Miracle on the Hudson describing the unlikely odds of his massive aircraft successfully ditched on Hudson River after suffering a strike with a flock of Canada geese and lost both engines shortly after taking off from New York’s own LaGuardia Airport.
Let’s see if Python can tell the difference between a normal Hudson River and Hudson River with an Airbus A320 on it.
Let’s start with converting the image to Black & White (“L”) in order to eliminate color differences and achieve computation simplicity with one channel color mode.
Code below might appear complex, it’s not. First half is figuring out where the big pixel difference happens. Second half is drawing an appropriate rectangle.
Last 3 lines is to show the image and save it as well. (I had to save the image to show it on this page, you may wanna skip that step.)
To see a tutorial about drawing on images and calculating box position you can see this post here.
To see a tutorial about digital image pixel positions you can see this post here.
So the code is simple. It looks for the first pixel where pixel difference between images is bigger than 25. As soon as it’s bigger than 25 the counter stops showing the different pixel’s position.
Then a division by 602 (image’s horizontal resolution) gives us the coordinates to draw the box. Box is drawn with an approximate negative margin so that the box covers the object as a whole.
c=0
for i in diff_pix:
if i > 25:
break
else:
c+=1
x10 = c%602
y10 = c//602
x1,y1,x2,y2 = x10-30, y10-20, x10+30, y10+20
Drawer = ImageDraw.Draw(data2)
Drawer.rectangle((x1, y1, x2, y2), outline="red", width=3)
f3 = r'C://Users/xx/Desktop/macfd3.bmp'
data2.show()
data2.save(f3)
Voila! We have an image with a drawing that points out the difference. It’s relatively manual and crude which can be good if you’re looking to practice a lot of fundamental coding concepts.
Python basically showing off its mind blowing versatility.
FULL PYTHON CODE
#Opening images and converting to B&W
f1 = r'C://Users/xx/Desktop/macfd.jpg'
f2 = r'C://Users/xx/Desktop/macfd2.jpg'
data1 = Image.open(f1)
data2 = Image.open(f2)
data3 = data1.convert("L")
data4 = data2.convert("L")
raw1 = data3.getdata()
raw2 = data4.getdata()
#Subtracting pixels
diff_pix = np.subtract(raw1,raw2)
#Creating a new image with only the different pixels
img_final = Image.new("L",(602,756))
img_final.putdata(diff_pix)
#Calculating box coordinates
c=0
for i in diff_pix:
if i > 25:
break
else:
c+=1
x10 = c%602
y10 = c//602
#Drawing the box
x1,y1,x2,y2 = x10-30, y10-20, x10+30, y10+20
Drawer = ImageDraw.Draw(data2)
Drawer.rectangle((x1, y1, x2, y2), outline="red", width=3)
#Saving the image with box
f3 = r'C://Users/xx/Desktop/macfd3.bmp'
data2.show()
data2.save(f3)