
- Create a new image
- Open, Show & Save images (PIL)
- Paste, Merge, Blend images (PIL)
- How to Draw shapes images (PIL)
- How to Crop an image (PIL)
- How to Add Text to images (PIL)
- How to Add Frames to images (PIL)
- How to Resize an image (PIL)
- Brightness, Contrast, Saturation
- Convert image to Grayscale | B&W
- Create Photo Collages
- Digital Image Color Modes
- Digital Image Basics
- Image Manipulation w/ PIL
- Batch Resize Multiple Images (PIL)
- Watermarking Images
- Difference Between 2 Images (PIL)
Creating Photo Collages
Introduction
Collages are compositions created using different components of visual objects. This form of creation can be used in business, art, newspapers, blogs and even music.
In this Python tutorial we will demonstrate how to create image collages using Python.
An image collage can easily be created using Python’s PIL module by creating a large enough “new image” which will be used as the collage layer or grid and by taking advantage of Python Loops to paste new images to the grid through iteration. We will explain each step below as clearly as possible.
1- Creating a New Image
You can create a new image using PIL’s new method as below. It’s important to pay attention to color modes here as they can significantly impact the image manipulations that can be done on them as well as image saving options.
Here is a new image example with .new() method. First parameter is the color mode of the image while the second parameter in a tuple is the dimensions of the image.
new = Image.new("RGBA", (2000,2000))
Here we are creating an image in RGBA mode with 2000 pixel width and 2000 pixel height. For an extensive knowledge regarding color modes you can visit this tutorial:
2- Preparing Individual Images
Whether it’s gathering images or creating effects we are going to have to prepare individual pieces that can be laid out together in a collage or image grid.
This can be achieved through iterating a single image to create multiple versions of it or we can also use multiple images.
For example check out this incomplete Python code:
c=1
for i in range(0,2000,500):
    for j in range(0,2000,500):
        new_img = filter.enhance(c)
        c+=0.02
Here we are creating a variable named c for creating different effects which is incremented inside the for loop at each iteration.
We also have nested loops this will allow us to iterate image positions on the grid with steps of 500 pixels. During the first iteration of the first loop, inner loop will create the first row.
Once first iteration of the first loop is complete second row will be created and so on until the end of the collage.
Also you can tell there will be 4 iterations each for both outer and inner loops since range function is used with steps of 500 from 0 to 2000.
You can also see that new_img file will have a new version at each iteration due to changing c parameter and effect applied based on that.
So if we just add an operation to past these new images to the bigger collage inside the iteration we will have a collage in our hands.
3- Paste Method
PIL has a useful method called paste() which can be used to paste an image on another image.
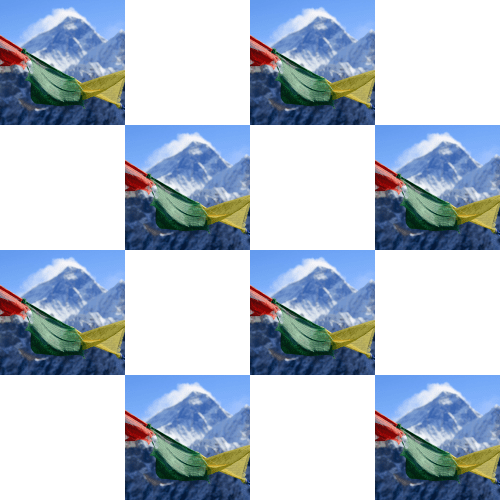
In the example below, using paste method we are pasting a smaller image named new_img to a new image we created using Image.new and named collage.
Our collage is a new image which consists of 2000 by 2000 pixels. Our piece of image is an actual photo we are opening using Image.open and is then resized to 500 by 500 pixels to fit the larger collage platform.
Finally, you can see paste is exercised with a coordination of (0,0) which will place it in the upper left corner of the collage. Let’s see the results.
from PIL import Image, ImageEnhance

new = Image.new("RGBA", (1000,1000))

img = Image.open("Desktop/300.jpg")
img = img.resize((500,500))
new.paste(img, (0,0))
new.paste(img, (500,500))

new.show()
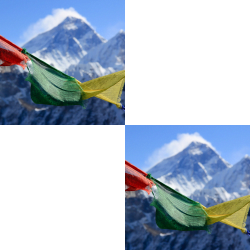
We won’t be able to save an RGBA image with Alpha transparency channel as a jpg file but it can be saved as a png.
This is a nice exercise for warming up let’s create a larger grid and spread the images on it to create an image collage.
from PIL import Image, ImageEnhance

new = Image.new("RGBA", (2000,2000))

img = Image.open("Desktop/300.jpg")
img = img.resize((500,500))

new.paste(img, (0,0))
new.paste(img, (1000,0))
new.paste(img, (500,500))
new.paste(img, (1500,500))
new.paste(img, (0,1000))
new.paste(img, (1000,1000))
new.paste(img, (500,1500))
new.paste(img, (1500,1500))

new.show()
Great. Now we are able to:
- Create a new image using PIL
- Open an existing image and resize it
- Paste the existing image on the large grid or layout image to create image collages
Now let’s attempt to perform some fancy tricks to create more sophisticated and give some ideas for future work.
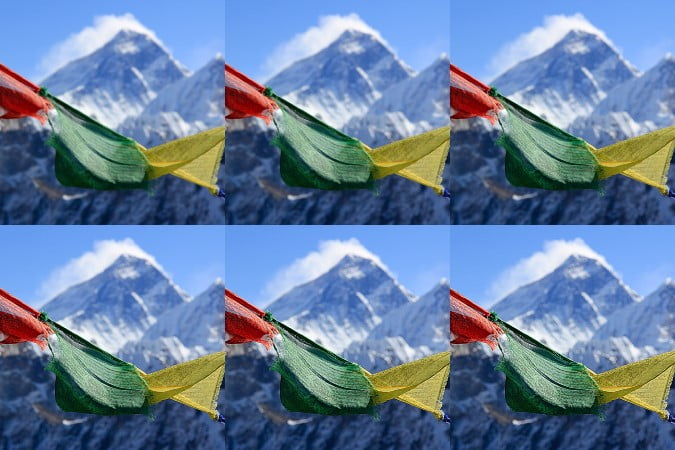
4- Example 1: Image Effects
Using the same logic introduced above we can create an iteration with for loop and apply new effects to the images at each iteration.
In this example, we are opening an image named 300.jpg, resizing it to 500X500 pixels, creating a brightness filter and applying it using variable c at each iteration.
We are also creating a new image with the applied effect at each iteration and pasting it on the collage.
newfrom PIL import Image, ImageEnhance
collage = Image.new("RGBA", (2000,1000))

img = Image.open("Desktop/300.jpg")
img = img.resize((500,500))

filter = ImageEnhance.Brightness(img)

c=0.7
for i in range(0,2000,500):
    for j in range(0,2000,500):
        new_img = filter.enhance(c)
        collage.paste(new_img, (j,i))
        c+=0.1
        print(c)
new.show()
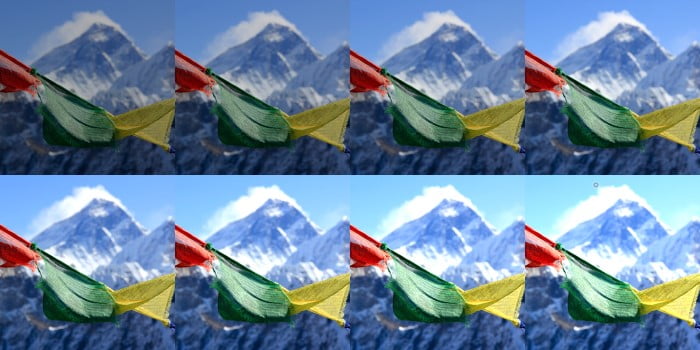
Great. This collage could be useful for a professional photographer or social media manager while trying to decide on the exact photo enhancement values.
We can do the same kind of operation with many other image effects available via PIL library. You can see a detailed tutorial about these effects in the link below:
Let’s showcase a few other examples created with the same logic of iterating using for loops. All we have to do is replace the filter and adjust the c enhancement parameter accordingly.
Please note some filters may require negative c values to create the same effects as below. You can see a detailed breakdown of the effects in the Image Effects Tutorial shared above.
filter = ImageEnhance.Color(img)

filter = ImageEnhance.Contrast(img)
filter = ImageEnhance.Sharpness(img)
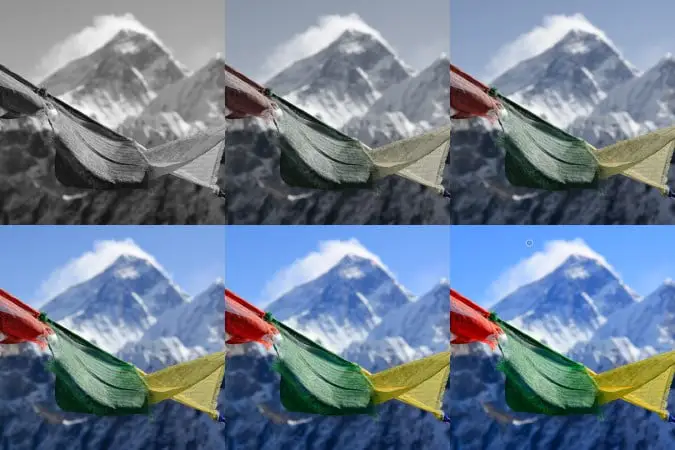
5- Example 2: Color Hue Layers
Another option is to create a semi-transparent layer with a certain color and then blend it with the image at hand to create a hue effect (or color tint). We can then iterate again and create fun collages with different images. Let’s try to implement it.
from PIL import Image, ImageDraw

collage = Image.new("RGBA", (1500,1500), color=(255,255,255,255))
photo = Image.open("Desktop/1200.jpg").convert("RGBA")
photo = new_img.resize((500,500))

for i in range(0,1500,500):
    rr=00
    bb=0
    gg=150
    for j in range(0,1500,500):

        hue = Image.new("RGBA", (photo.size), color=(rr,gg,bb))
        new_img = Image.blend(photo,hue,0.5)
        rr+=50
        bb+=50
        gg-=50

        collage.paste(new_img, (i,j))
collage.show()
In this Python code we are creating a collage, opening an image with variable: photo. Then inside the inner for loop we are creating a new image and manipulate its RGB channels via color parameter.
Additionally, we are creating a new image called new_img by blending hue layer and the original photo we opened (photo) 50/50. This blending task is done using handy Image.blend() method with alpha value of 0.5.
The results are interesting.
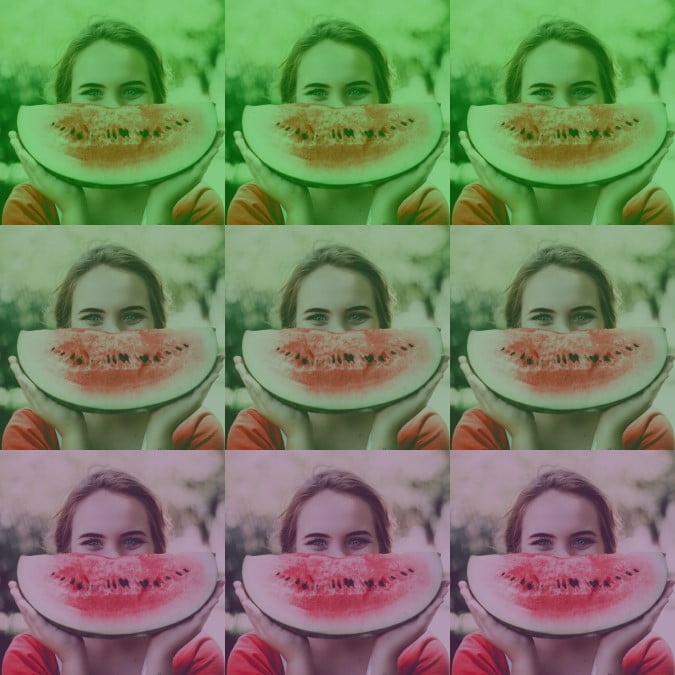
Since gg value is initially 150 and rr and bb are 0, and then this green image is blended with the photo by a factor of 50% transparency, image collage starts with a greenish image.
Throughout the iteration green channel is decremented by 50 at each iteration while red and blue channels are incremented by 50. The result is decreasing green tint at each photo and increasing red and blue tints.
There is no hue effect in PIL but this low level digital image manipulation is an example to the creative outcomes that can be achieved with Python programming.
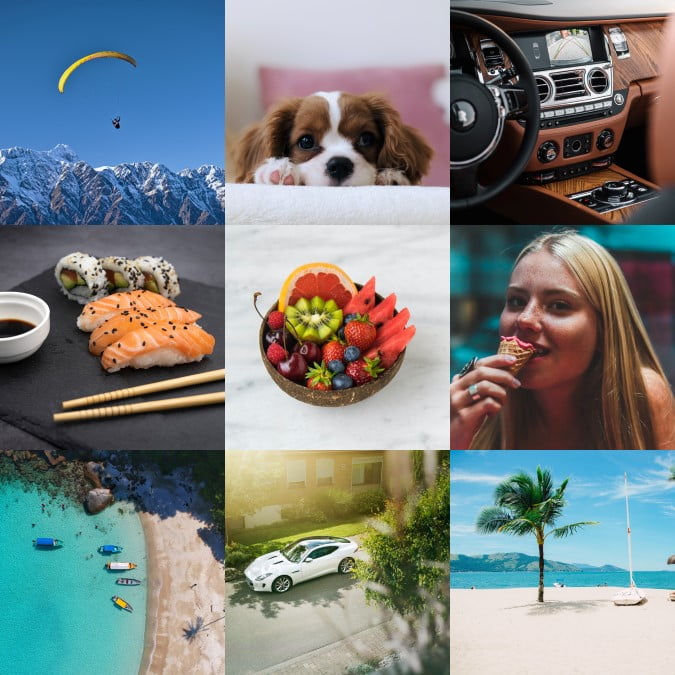
6- Example 3: Image Batch
Another idea is to iterate through different images and create a collage with them. This can simply be achieved by opening a different image at each iteration and pasting it to the collage.
In this example we will use a sequence of file names in Desktop folder and concatenate them. Image file names can also be read automatically from inside a folder using listdir() method from os library.
For a similar example created with listdir() method you can visit this tutorial:
from PIL import Image, ImageDraw

collage = Image.new("RGBA", (1500,1500), color=(255,255,255,255))
lst = [100, 200, 300, 400, 500, 600, 700, 800, 900]

c=0
for i in range(0,1500,500):
    for j in range(0,1500,500):
        file = "Desktop/"+str(lst[c])+".jpg"
        photo = Image.open(file).convert("RGBA")
        photo = photo.resize((500,500))

        collage.paste(photo, (i,j))
        c+=1
collage.show()
8- How to Save Image Collages
Since we have an image object at hand saving a collage is not very different than saving individual images in Python. You can see the code example below. Also, we have a dedicated PIL tutorial which you are welcome to visit for more details:
If you are interested in different color modes and their interaction with file types such as jpg, png, bmp and gif then you can visit this tutorial as well:
And also you can learn a lot about the fundamentals of digital images from this one:
collage.save("Desktop/collage.png")
Summary
In this Python Tutorial we learned how to create image collages using a variety of different techniques.
- Ex1: Image Collage with different effects
- Ex2: Image Collage with different hues (color tints)
- Ex3: Image Collage with different images
We took advantage of opening images, creating new images, saving images and used namely: new, open, resize, paste and blend methods.