
- Create a new image
- Open, Show & Save images (PIL)
- Paste, Merge, Blend images (PIL)
- How to Draw shapes images (PIL)
- How to Crop an image (PIL)
- How to Add Text to images (PIL)
- How to Add Frames to images (PIL)
- How to Resize an image (PIL)
- Brightness, Contrast, Saturation
- Convert image to Grayscale | B&W
- Create Photo Collages
- Digital Image Color Modes
- Digital Image Basics
- Image Manipulation w/ PIL
- Batch Resize Multiple Images (PIL)
- Watermarking Images
- Difference Between 2 Images (PIL)
How to convert an image to Black & White in Python (PIL) – Python Examples

Holy Python is reader-supported. When you buy through links on our site, we may earn an affiliate commission.
Introduction
There are many ways to convert a color image to black and white or grayscale image. Depending on your project one of these methods can be more suitable than others.
In this Python tutorial we will cover multiple methods to get black and white images with programming, the tutorial includes PIL library information, syntax information and basic digital image information as well as several examples for demonstration.
We are going to show you how to achieve grayscale or black and white images quickly and practically using Python’s PIL (pillow) image processing library’s Image and ImageEnhance modules.
Initial Black & White Conversion Steps:
- Let’s first import the Python libraries and modules we will need.
- Let’s also get a colorful image ready to work on it.
from PIL import Image, ImageEnhance

file = "C://Users/ABC/20.jpg"
img = Image.open(file)
img.show()
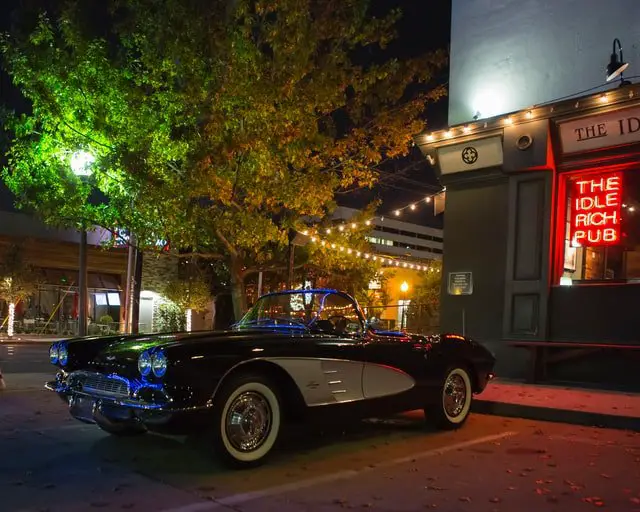
That’s a pretty rich image showing all ranges of red, green and blue as well as some neutral lights. It will be fun to work on it.
.convert method : Converting between digital image color modes
This method can be particularly useful if you’re looking to achieve a truly B&W or grayscale image.
- All you have to do is use .convert method from Image module.
- Convert the image to one of the color modes that are convenient for your task. Image modes can be as following for monochrome (B&W and grayscale): L, LA, 1
Digital Image B&W, Grayscale Color Modes
This method can be particularly useful if you’re looking to achieve a truly B&W or grayscale image.
- L : This image mode has one channel that can take any value between 0 and 255 representing white, black and all the shades of gray in between. It’s an 8-bit grayscale image mode. L stands for Luminance channel.
- LA : Represents L with Alpha transparency channel. This mode can be used to achieve grayscale images with transparency. And don’t forget only png and gif image file types support transparency channel.
- 1 : This image mode is true black & white. It only has one channel which takes only two value representing full white or full black. There is no in between meaning no gray.
.Color() method
.Color mode from ImageEnhance module can also be used to create a grayscale image.
All you have to do is create a filter with .Color method and apply it on the image with .enhance() method with a factor value of 0 in it.
Manual Pixel Manipulation
There are different image hashes that can be used to transform color images to grayscale.
In summary, color images usually use the RGB format which means every pixel is represented by a tuple of three value (red, green and blue) in Python.
L mode on the other hand only uses one value between 0-255 for each pixel (8-bit).
So, how do we achieve one value from those three pixel values? We need some kind of averaging.
One of the standards that can be used is Recommendation 601 from ITU-R (Radiocommunication Sector of International Telecommunication Union or ITU) organization which is also used by pillow library while converting color images to grayscale. The formula is something like this:
ITU-R 601 7th Edition Construction of Luminance formula:
L = R * 299/1000 + G * 587/1000 + B * 114/1000
By iterating through each pixel you can convert 24-bit to 8-bit or 3 channel to 1 channel for each pixel by using the formula above.
You can read the original ITU-R Recommendation 601 7th edition.
Alternatively, you can try Rec. 709
L = R * 2125/10000 + G * 7154/10000 + B * 0721/10000
You can read the original ITU-R Recommendation 709 6th edition.
Example 1: Converting image mode to 1, L or LA
This is by far the most common method to acquire monochrome (B&W and or grayscale) images. Let’s see a few examples.
from PIL import Image

file = "C://Users/ABC/20.jpg"
img = Image.open(file)

img.convert("1")
img.show()
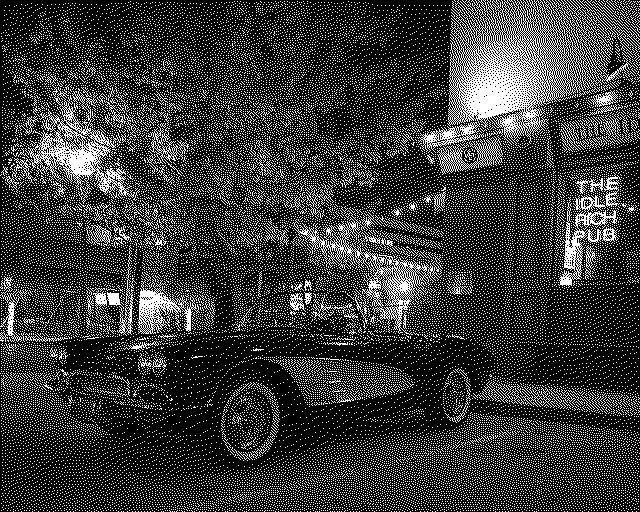
You may think the result is too rough and somewhat useless. This is true. The reason is if you apply “1” mode you will want to apply it to a high resolution image so that black and white pixels are blend better.
Check out this higher resolution image (2400 x 1920) that’s also converted to “1” mode but the result is much smoother.

And here is a grayscale example. In this example we’re converting the image to “L” mode.
from PIL import Image

file = "C://Users/ABC/20.jpg"
img = Image.open(file)

img = img.convert("L")
img.show()
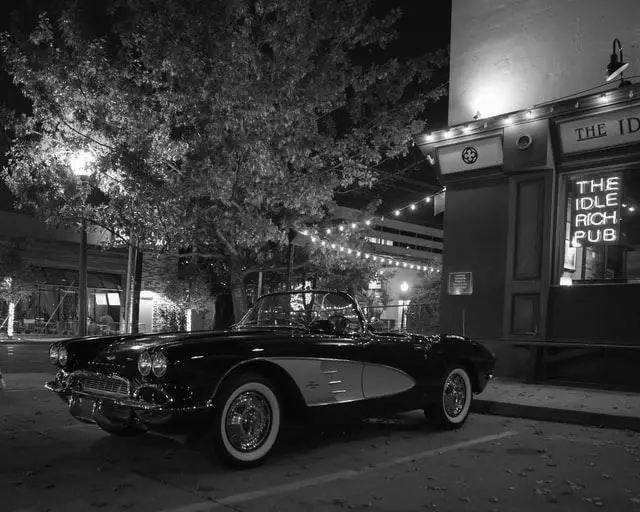
You can tell the result is much smoother with black, white and gray shades filling each pixel accurately. You can also use LA mode with transparency to achieve the same result with the liberty of alpha channel for transparency needs.
But you can only save LA as png or gif file types since they are the ones that work with transparency.
Example 2: ImageEnhance.Color() method to get Grayscale images
You can also simply apply the .Color() method with a value of 0 which will turn down all the RGB colors and turn in a grayscale image.
Here is an example:
from PIL import Image

file = "C://Users/ABC/20jpg"
img = Image.open(file)

filter = ImageEnhance.Color(img)
filter.enhance(0)
img.show()

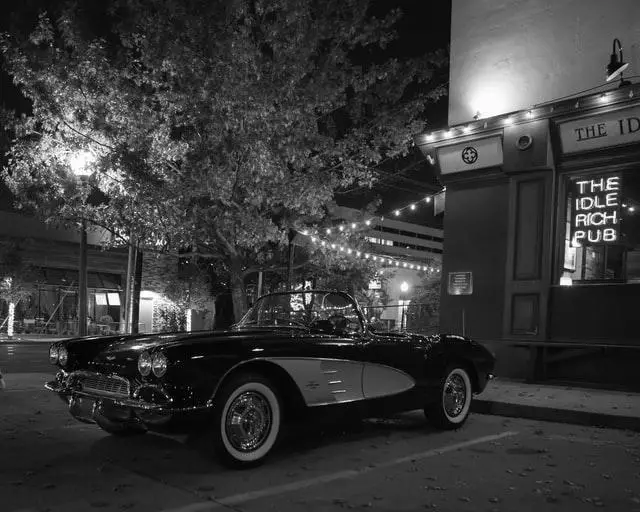
The results you get with this method will be visually identical to converting the image to L or LA modes.
However, size and computation wise it might be slightly inefficient.
If we compare first pixel of “L” image above and image to which we applied .Color method we get two different results at pixel level:
- L mode grayscale image: 13
- .Color method applied grayscale image: (13, 13, 13)
So, what we’re seeing is that in the former example grayscale is achieved by equalizing each RGB channel value while L mode only works with one channel that gets values between 0-255 (8-bit).
.Color method will return a 24-bit color depth image since there are three 8-bit channels being used.
Example 3: Manually converting each color pixel to grayscale pixels
This method is a bit low level but sometimes you learn most when you do things at the low-level.
Steps for manually manipulating pixels to achieve a grayscale image from a color image:
- We will open a color image.
- We will get each pixel’s data from it as tuples using .getdata() method.
- We will iterate through the list of tuples and average each pixel’s RGB (24 bit) value to one single lumination value.
- We will use ITU-R 709 standard 6th edition formula as explained above
- We will create a list of new 8 bit data which consists of one channel.
- We will create a new image with “L” mode and exactly the size of color image
- We will build the new image from this list of pixels using .putdata() method
Formula for the weights will be:
L = R * 2125/10000 + G * 7154/10000 + B * 0721/10000
from PIL import Image, ImageEnhance

img = Image.open("Desktop/11.jpg")
img_data = img.getdata()

lst=[]
for i in img_data:

    # lst.append(i[0]*0.299+i[1]*0.587+i[2]*0.114) ### Rec. 609-7 weights
    lst.append(i[0]*0.2125+i[1]*0.7174+i[2]*0.0721) ### Rec. 709-6 weights

new_img = Image.new("L", img.size)
new_img.putdata(lst)

new_img.show()
If you compare this image to Pillow’s L mode conversion you will see a tiny difference of light density around the lamp and neon letters on the window. This is because PIL’s convert method uses Rec. 601-7 standard.
Resources
If you’d like to see more interesting content regarding image processing in Python you may want to check out our more advanced Python PIL tutorials as well as Digital Imaging basics below:
Recommended Python PIL Tutorials
Basic:
- How to open, show and save images with PIL
- Digital Image Basics With PIL Library In Python
- How to Resize an Image and Get Size in Python (PIL)
- How to adjust brightness, contrast, sharpness and saturation of images (PIL)
- How to convert an image to B&W or Grayscale
- Digital Image Color Modes
Summary
In this Python Tutorial, we have covered B&W and grayscale conversions in depth. Namely we have used; Image module’s .convert() and ImageEnhance module’s .Color methods. We have also covered a number of related image color modes such as; 1-bit image, L image and LA image (L with alpha).
We have seen concepts such as pixels, image color modes, high-level grayscale conversion methods as well as pixel level iteration to achieve the same results.
This tutorial can be a great Python and Computer Science practice since it involves learning about an interesting niche field such as digital imaging as well as using Python libraries.
Furthermore, manual method described in this tutorial can be a great practice to understand digital images, pixels, basic Python concepts (such as for loops, while loops, iteration, lists, tuples, variables etc.) for universities, other educational institutions, work training and for Python beginners alike.