
- Create a new image
- Open, Show & Save images (PIL)
- Paste, Merge, Blend images (PIL)
- How to Crop an image (PIL)
- How to Add Text to images (PIL)
- How to Add Frames to images (PIL)
- How to Resize an image (PIL)
- Brightness, Contrast, Saturation
- Convert image to Grayscale | B&W
- Create Photo Collages
- Digital Image Color Modes
- Digital Image Basics
- Image Manipulation w/ PIL
- Batch Resize Multiple Images (PIL)
- Watermarking Images
- Difference Between 2 Images (PIL)
How to Add Frames to Images in Python (via PIL Library)
Introduction
You might need to add borders or frames to your images for presentations or other decorative reasons. Frames are a good way to improve photographic presentation and they bring more focus to the image being presented. Photo frames or borders can even be useful in science publications or consulting reports.
In this tutorial, we will learn how to achieve photo / image frames using Python very quickly and intuitively. We will also provide multiple methods so you can choose the most suitable code for your image frame application.
We are going to be using Image, ImageDraw and ImageOps modules from the PIL library mainly so let’s import those first.
from PIL import Image, ImageDraw, ImageOps
Method 1: Adding Photo Frames with ImageOps
You can create a new image using PIL’s new method as below. It’s important to pay attention to color modes here as they can significantly impact the image manipulations that can be done on them as well as image saving options.
Here is a new image example with .new() method. First parameter is the color mode of the image while the second parameter in a tuple is the dimensions of the image.
Open or Create an Image
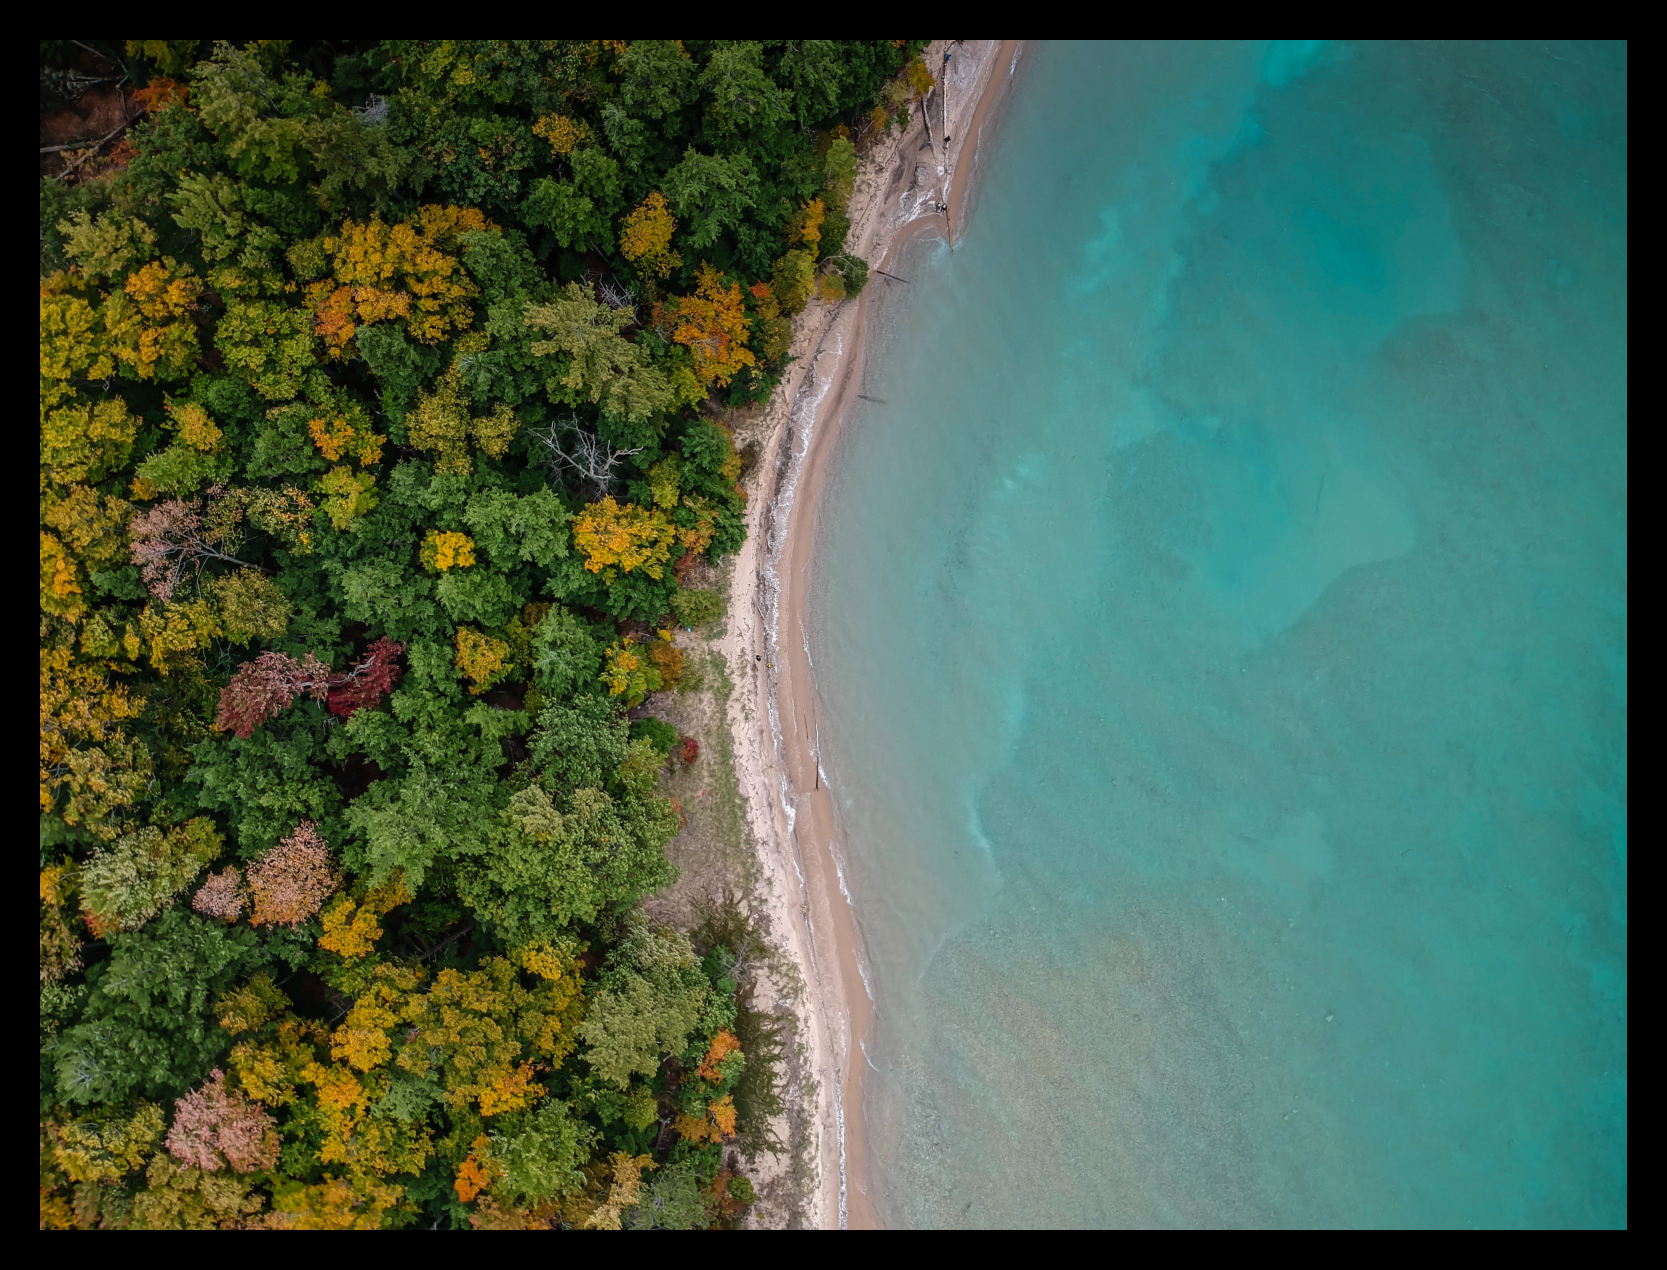
img = Image.open('/home/usa/Downloads/Wallpaperz/nick-perez-duvq92-VCZ4-unsplash.jpg')
Apply the .expand method from ImageOps module of PIL
new_img = ImageOps.expand(img, border=100)
new_img.show()
Nice and easy. ImageOps.expand method is probably the most suitable for simple outer border type frames.
Method 2: Adding Image Borders with Image.new & .paste
Alternatively, we can create a new image that’s slightly larger than our existing image which we desire to apply borders to and then we can paste the existing image to this new empty canvas that’s slightly larger which would yield a nice border effect.
The code below can be analyzed in 3 steps:
- An image is opened. This is the image that needs to be framed
- A new blank image is created. The existing image will be pasted over this one. So, the size of this image is the size of the opened image plus some margin for borders. Smart part of this code is that the base image dimensions are calculated relative to the existing image. Instead of hard coding the size parameter, this dynamic programming technique makes it more reusable and more convenient. Additionally, a suitable color is chosen which will end up being the border colors of the final composition.
- Final part is the opened image is pasted on the new base layer: .paste method takes a tuple argument. These are the coordinates where pasting originates from. It’s relative to the upper-left corner. So, as the new image is bigger in both dimensions with a margin of 300 (pad) and border margin applies to two sides, we are pasting starting from 150th pixel (pad//2).
* It’s beneficial to use “Floor Division Operator //” instead of “Float Division Operator /” at 3rd step because floor division rounds down the division to the next integer while float division yields a result with decimals which may confuse the program as pixels don’t exist in decimal state. (You can revisit our Python Operator Tips and Arithmetic Python Operators lesson for more insight.)
from PIL import Image

img = Image.open('/home/usa/Downloads/Wallpaperz/nick-perez-duvq92-vcz4-unsplash.jpg')
width, height= img.size
pad = 300
base_img = Image.new("rgba", (width+pad, height+pad), color='papayawhip')

base_img.paste(img,(pad//2, pad//2))
base_img.show()
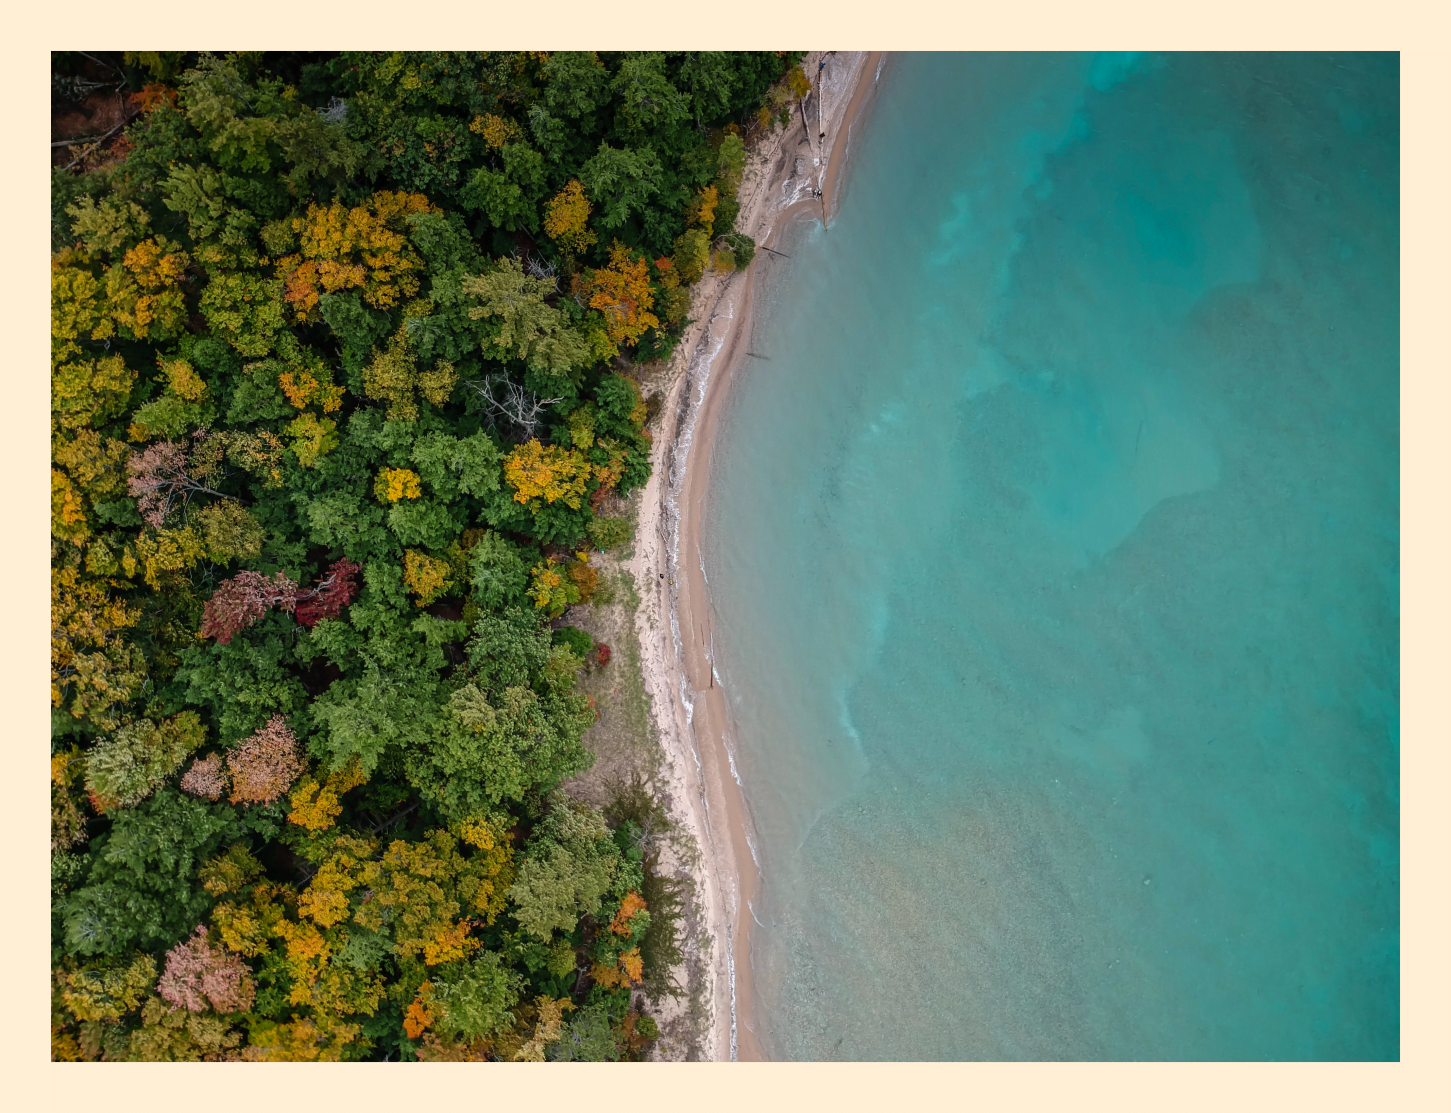
Alternatively, we can create a new image that’s slightly larger than our existing image which we desire to apply borders to and then we can paste the existing image to this new empty canvas that’s slightly larger which would yield a nice border effect.
Method 3: Adding Image Frames with ImageDraw.draw.line
We can use “draw.lines” method to improve the aesthetics of an existing border or frame as well as create new borders by drawing each side separately.
Here is an example where 4 lines are drawn for the outer borders and 4 thinner lines are drawn for the inner borders as well resulting in an improved frame look for the existing image.
We have a dedicated Python tutorial with examples for ImageDraw module. Feel free to visit it for more ideas below:
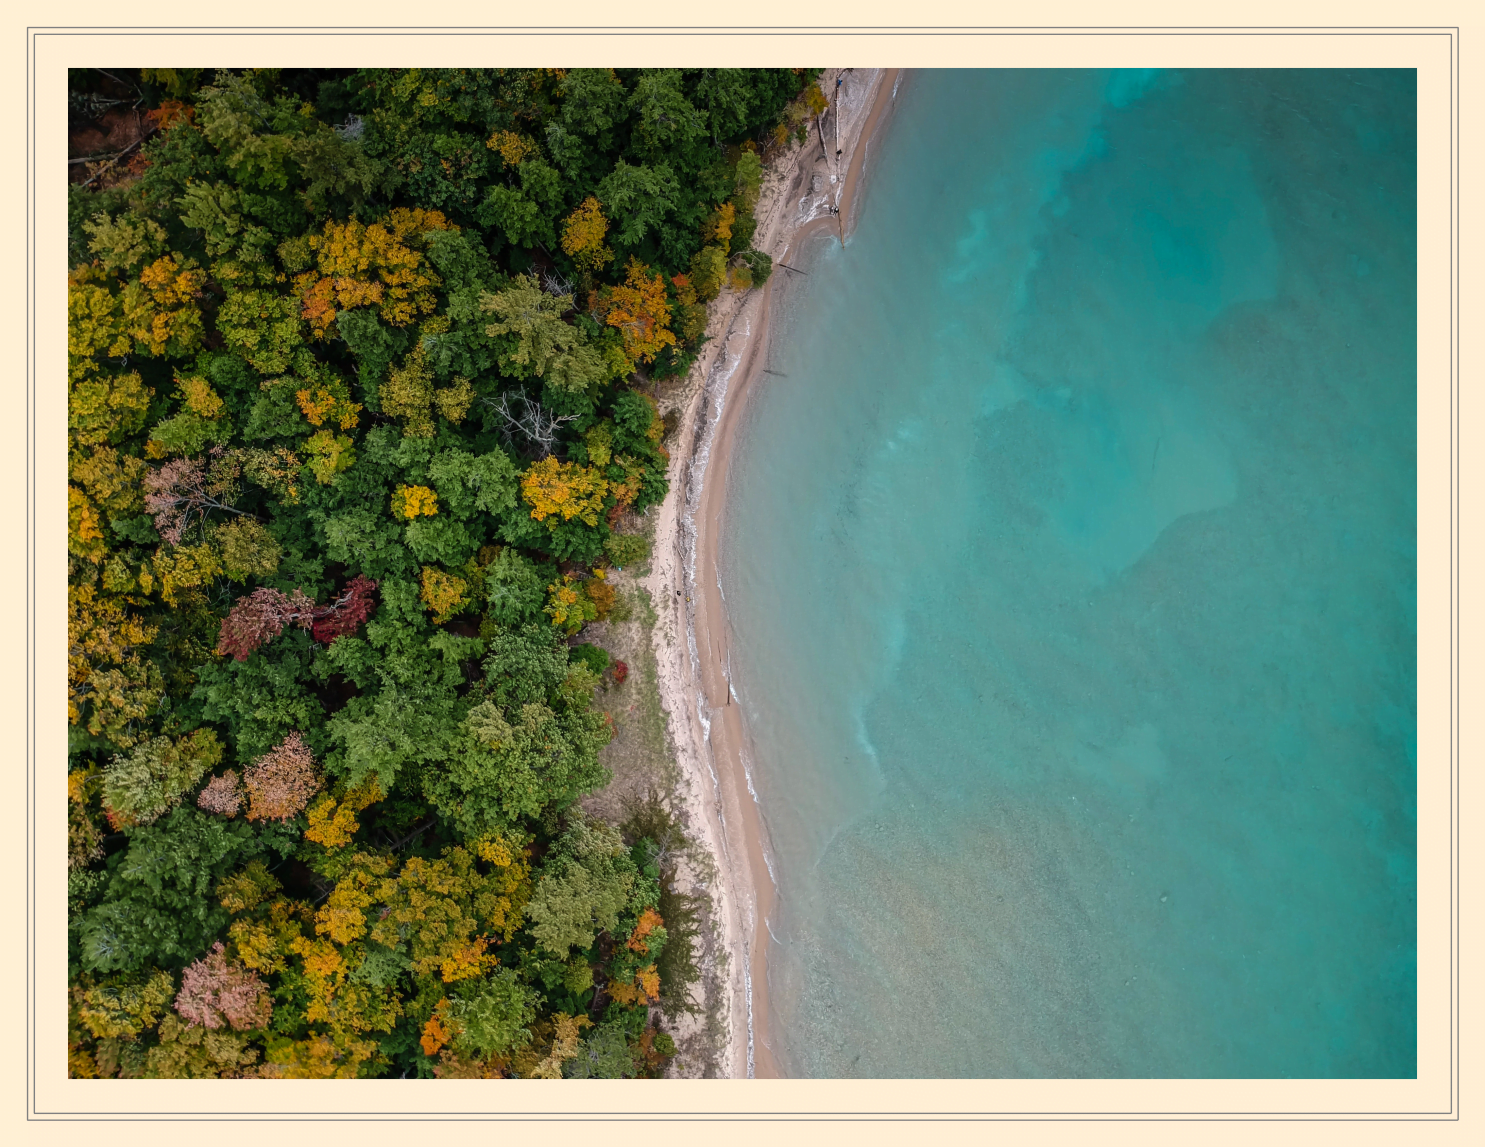
img = Image.open('/home/usa/Downloads/Wallpaperz/nick-perez-duvq92-VCZ4-unsplash.jpg')
width, height= img.size
pad = 400

base_img = Image.new("RGBA", (width+pad, height+pad), color='papayawhip')
draw=ImageDraw.Draw(base_img)
base_img.paste(img,(pad//2, pad//2))

#Frame 1
new_width, new_height = base_img.size
xleft, xright = 100, new_width-100
yhigh, ylow = 100, new_height-100
frame1_line_width=4
frame1_line_color='gray'

draw.line((xleft, yhigh, xright, yhigh), fill=frame1_line_color, width=frame1_line_width)
draw.line((xleft, ylow, xright, ylow), fill=frame1_line_color, width=frame1_line_width)
draw.line((xleft, yhigh, xleft, ylow), fill=frame1_line_color, width=frame1_line_width)
draw.line((xright, yhigh, xright, ylow), fill=frame1_line_color, width=frame1_line_width)

#Frame 2
new_width, new_height = base_img.size
xleft, xright = 80, new_width-80
yhigh, ylow = 80, new_height-80
frame1_line_width=4
frame1_line_color='gray'

draw.line((xleft, yhigh, xright, yhigh), fill=frame1_line_color, width=frame1_line_width)
draw.line((xleft, ylow, xright, ylow), fill=frame1_line_color, width=frame1_line_width)
draw.line((xleft, yhigh, xleft, ylow), fill=frame1_line_color, width=frame1_line_width)
draw.line((xright, yhigh, xright, ylow), fill=frame1_line_color, width=frame1_line_width)

base_img.show()
I just copy pasted the Frame 2 part and only changed the pad variable slightly to line up the frames. Although it’s pretty straightforward and demonstrable this way this code would benefit greatly from writing a user defined Python function to avoid repetitiveness.
Method 4: Adding Image Frames with ImageDraw.draw.rectangle
We can achieve similar results with draw.rectangle function and the code will be a lot tidier compared to drawing each line separately.
Here is a cool example mixed with text on image feature.
* This code only demonstrates the image frame and excludes the text parts for simplicity.
You can refer to our dedicated tutorial for adding text on images with Python.
x,y = img.size

#Frame 1
xleft, xright = 100, x-100
yhigh, ylow = 100, y-100
frame1_line_width=1
frame1_line_color='gray'

draw.line((xleft, yhigh, xright, yhigh), fill=frame1_line_color, width=frame1_line_width)
draw.line((xleft, ylow, xright, ylow), fill=frame1_line_color, width=frame1_line_width)
draw.line((xleft, yhigh, xleft, ylow), fill=frame1_line_color, width=frame1_line_width)
draw.line((xright, yhigh, xright, ylow), fill=frame1_line_color, width=frame1_line_width)

#Frame 2
xleft, xright = 50, x-50
yhigh, ylow = 50, y-50
frame2_line_width=9
frame2_line_color='white'

draw.line((xleft, yhigh, xright, yhigh), fill=frame2_line_color, width=frame2_line_width)
draw.line((xleft, ylow, xright, ylow), fill=frame2_line_color, width=frame2_line_width)
draw.line((xleft, yhigh, xleft, ylow), fill=frame2_line_color, width=frame2_line_width)
draw.line((xright, yhigh, xright, ylow), fill=frame2_line_color, width=frame2_line_width)
Method 5: Adding Image Borders with Opencv's copyMakeBorder
Another interesting option we have is from the opencv library. Opencv has a function called copyMakeBorder which can be used to add borders very conveniently.
Additionally, copyMakeBorder has some interesting features that are hard to find elsewhere.
In this section we will take a look at those options and demonstrate them.
Borders with the BORDER_CONSTANT parameter
import cv2
img = cv2.imread('/home/usa/Downloads/Wallpaperz/nick-perez-duvq92-VCZ4-unsplash.jpg')

new_img = cv2.copyMakeBorder(img, 280, 280, 280, 280, cv2.BORDER_CONSTANT, value=[100,128,128])

cv2.imwrite('new_img.png', new_img)
Borders with the BORDER_REFLECT parameter
You can also use a bunch of specific methods to create a reflection effect along the frame using opencv.
Borders with the BORDER_WRAP parameter
import cv2
img = cv2.imread('/home/usa/Downloads/Wallpaperz/nick-perez-duvq92-VCZ4-unsplash.jpg')

new_img = cv2.copyMakeBorder(img, 280, 280, 280, 280, cv2.BORDER_WRAP)
#new_img = cv2.copyMakeBorder(img, 280, 280, 280, 280, cv2.BORDER_CONSTANT, value=[100,128,128])

cv2.imwrite('new_img.png', new_img)
Borders with the BORDER_REPLICATE parameter
Border replicate also repeats the edges of the images and can be used for a different effect as well.
Borders with the BORDER_DEFAULT parameter
There is also a border_default option which you can choose as the border type.
Summary
In this Python Tutorial we learned how to create borders and frames around images using Python’s PIL library as well as the OpenCV library.
- Example 1: Frames using the ImageOps module
- Example 2: Border using the New Image method
- Example 3: Frames using the .draw() method. (by drawing lines)
- Example 4: Frames using the .draw() method. (by drawing rectangles)
We used various image editing methods such as .paste(), .line(), .draw(), .new() and a few others.
We have a few powerful tutorials regarding image editing with Python examples via the PIL library. You are welcome to review those for getting some inspiration and technical new Python skills.