What is watermarking?
Watermarking is a technology of printing less opaque text or symbols on images and items. Believe it or not it’s considered an ancient technology as old as paper since it’s been used on special letters, stamps and printed currency.
As digital imaging has never been such a humongous part of humans’ lives, the usage, creation and demand related to digital images rises as well. Despite the rise of open source and sharing mentality in the digital community, there seems to still be significant room for watermarking applications and so the demand for innovation continues.

Why Watermarkd?
Watermarkd is a Python library published by Holypython.com under the open source license Apache-2.0.
In this post we will try to demonstrate what can be accomplished with Watermarkd library.
Watermarkd library allows users to handle watermarking operations in Python directly from the terminal or through use of an optional GUI component.
Since it’s specialized only for watermarking tasks, Watermarkd has a very light graphical user interface. You can probably get an image watermarked (or watermarkd!) during the time it takes to start up a major Image Manipulation software.
It has the most commonly used features when it comes to watermarking and expected to cater to 90% or more of the people looking to watermark an image.
How does Watermarkd work?
Currently, Watermarkd library consists of one sole class named Spread which houses two functions that spread out watermark text on image(s):
- single function: Spread.single() can be used to apply watermark on a single image (photo).
- batch function: Spread.batch() can be used to apply watermark to multiple images in a folder.


Below you can see various usage types of Watermarkd Library under four titles:
Single Function Usage
Single function can be used in two main ways:
- through command line without any interface using its parameters
- through GUI by enabling gui parameter via True boolean.
as simple as passing True argument to gui as below:
single(gui=True)
Let’s first investigate usage scenarios without gui:
import Watermarkd as wmd

wmd.Spread.single(img_path=r"c:/myimage.png")
This code, once executed, will create a watermarkd image on the user’s Desktop. You don’t have to assign gui parameter to False since it’s the default option. So, basically it’s the same thing as this code:
wmd.Spread.single(gui=False, img_path=r"c:/myimage.png")
Also, please note that, when not using gui, the only parameter you have to pass an argument to is img_path, since all the other parameters have default values and hence, they are optional.
Let’s continue to explore other parameters that can be passed to the single function:
- gui, (bool), default False : enables GUI
- img_path, (string), mandatory parameter :signifies image path
- wm_text, (string), default= “Watermarkd”) : Watermark Text
- wm_trans, (int [1-255]), default= 85 : Signifies Watermark Transparency
- font_size, (int), default= 55) : Watermark Font Size
- font_name, (string), default= “arial.ttf” : Font Type
- filename, (string), default=”Watermarkd” : File Name for Saving
- save_to_path, (string), default=”Desktop/watermarkd_” : Saving Folder Path
- save_to_suffix, (string), default=”.png” : File Type for Saving
- output_filename, (default= r”c:/Users/”+user_path+”/Desktop/watermarkd.png”) : File Name For Saving
Here is another example, in which watermark text is assigned to “Inception”:
from Watermarkd import Spread

f = r"c:/Users/ABC/Desktop/film.png"
Spread.single(img_path=f, wm_text="Inception")

Batch Function Usage
Batch function is very similar to single function with a few subtle differences. First and foremost, it handles a folder of images rather than a single image.
So, img_path parameter is exchanged with folder_path parameter.
Otherwise the rest of the differences are mainly internal which you can check out in the source code if you like.
from Watermarkd import Spread

Spread.batch(folder_path=r"c:/User/ABC/New_Photos")
This code will read all the images from the given folder New_Photos, and create an output folder named Watermarkd_ in user’s Desktop and save all the watermarked files there with the default values for optional parameters. Check out a list of parameters below for adjusting different values such as: watermark text, font size, font type, file name, path name, transparency etc.
If you check out the source code, most of the variable names are also conveniently borrowed from the single function.
Regarding the inner workings of the batch function, the main thing is: it doesn’t apply the watermarking algorithm to a single image, instead watermarking algorithm and positioning etc are placed inside a for loop which iterates through the images in the given folder.
So, in simpler words, folder is iterated with a for loop, image file name is taken which becomes the img_path similar to single function, then watermarking is applied and then files is saved and next iteration starts with the next file.
Here is another example:
from Watermarkd import Spread

f=r"c:/User/ABC/New_Photos"
Spread.batch(folder_path=f, wm_text="Photographer A. C. Jonah, #927-654-92**")
- gui, (bool), default False : enables GUI
- folder_path, (string), mandatory parameter :signifies folder path
- wm_text, (string), default= “Watermarkd”) : Watermark Text
- wm_trans, (int [1-255]), default= 85 : Signifies Watermark Transparency
- font_size, (int), default= 55) : Watermark Font Size
- font_name, (string), default= “arial.ttf” : Font Type
- filename, (string), default=”Watermarkd” : File Name for Saving
- save_to_path, (string), default=”Desktop/watermarkd_” : Saving Folder Path
- save_to_suffix, (string), default=”.png” : File Type for Saving
- output_filename, (default= r”c:/Users/”+user_path+”/Desktop/watermarkd.png”) : File Name For Saving


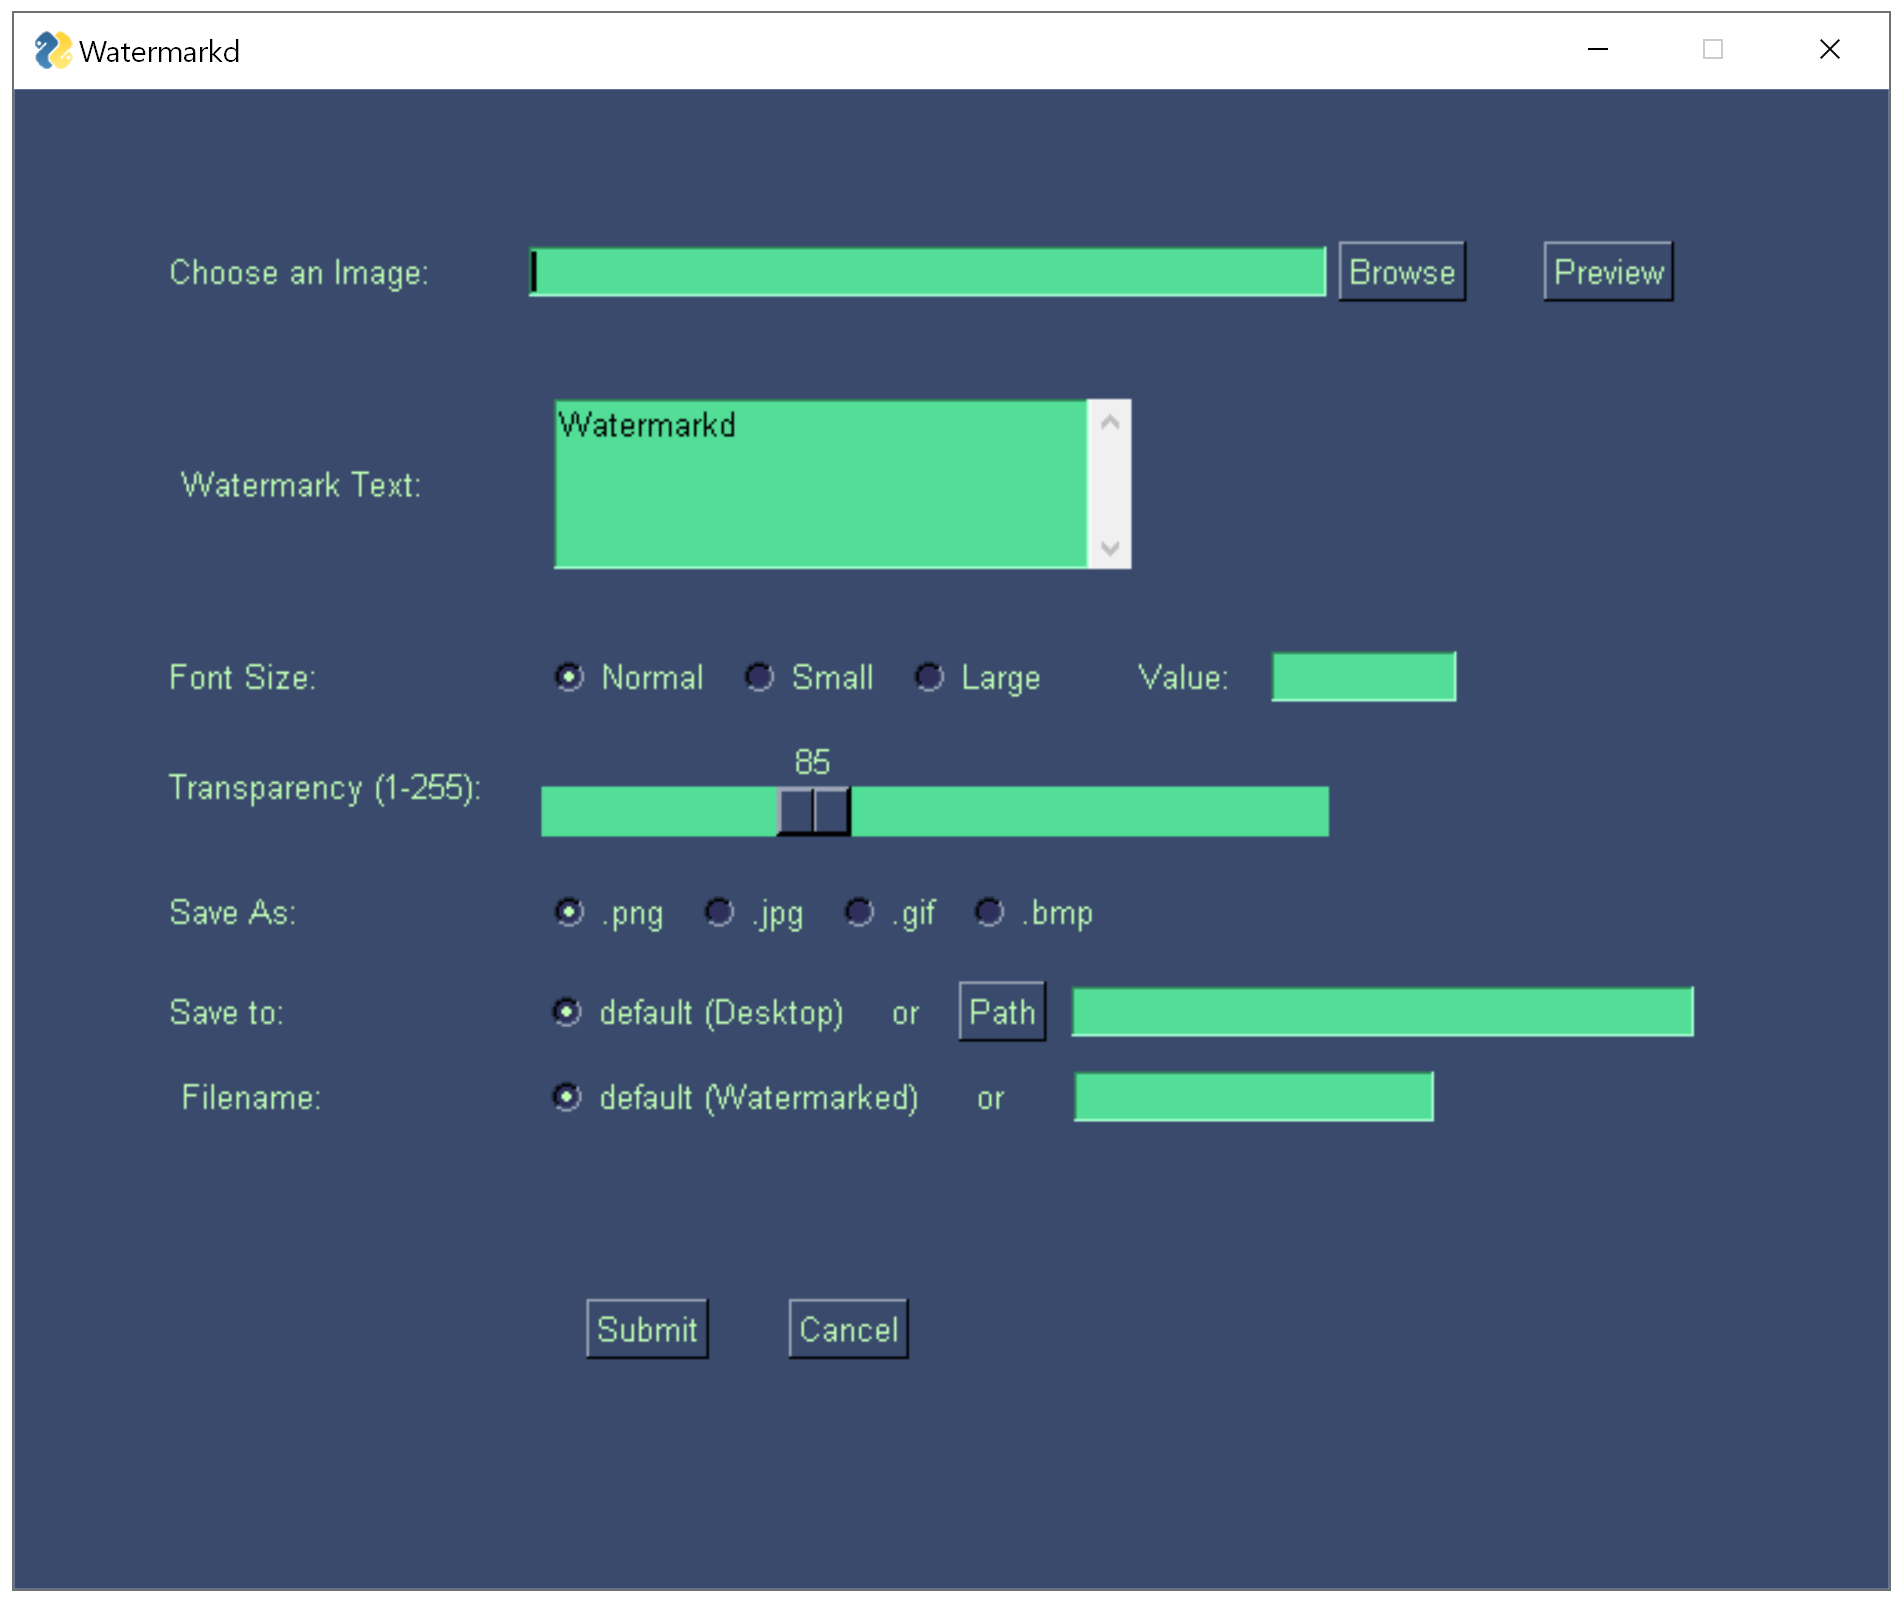
Watermarkd Usage: Single Function with GUI
Usage with GUI is pretty straightforward.
- Pick an image file
- Type your watermark text
- Choose a watermark text size. Options are:
- Normal (by default)
- Small
- Large
- Value: Let’s a custom font value to be entered. Possibly something like ~150 for high rez images where something like 30 might suffice for a low resolution image.
- Transparency: This value defines the transparency (or opacity) of your watermark text. 85 is the default value but you can go all the way down to 0 for a completely transparent text (Watermark would be invisible then). 255, the maximum value will create a solid white watermark text (which is more just a white text than watermark since it’s not transparent at all. It can sometimes be useful nevertheless.)
- Save as: Different options to save watermarked image as different image types such as:
- png (default)
- jpg
- gif
- bmp
- Save to: Path or folder that you’d like to save your watermarked image to. You can either type it or choose it with the help of the Path button.
- Filename: Filename you’d like to save your watermarked image under.
Once submit is pressed all the inputs from the user get registered and watermarking process starts.
It can last anywhere between miliseconds to a couple of seconds depending on the resolution of the image. (For the very high resolutions you might need to allow 2-3 seconds which also depends on the availability of computation resources.)
Just as GUI is a new dimension for the Python coder, Packaging also is a new dimension that opens up a whole new world of opportunities and skillset.
To activate GUI component all you have to do is:
Spread.single(gui=True)
You don’t have to pass any other arguments to setting parameters since they’ll be overridden after the GUI is executed.
from Watermarkd import Spread

Spread.single(gui=True)
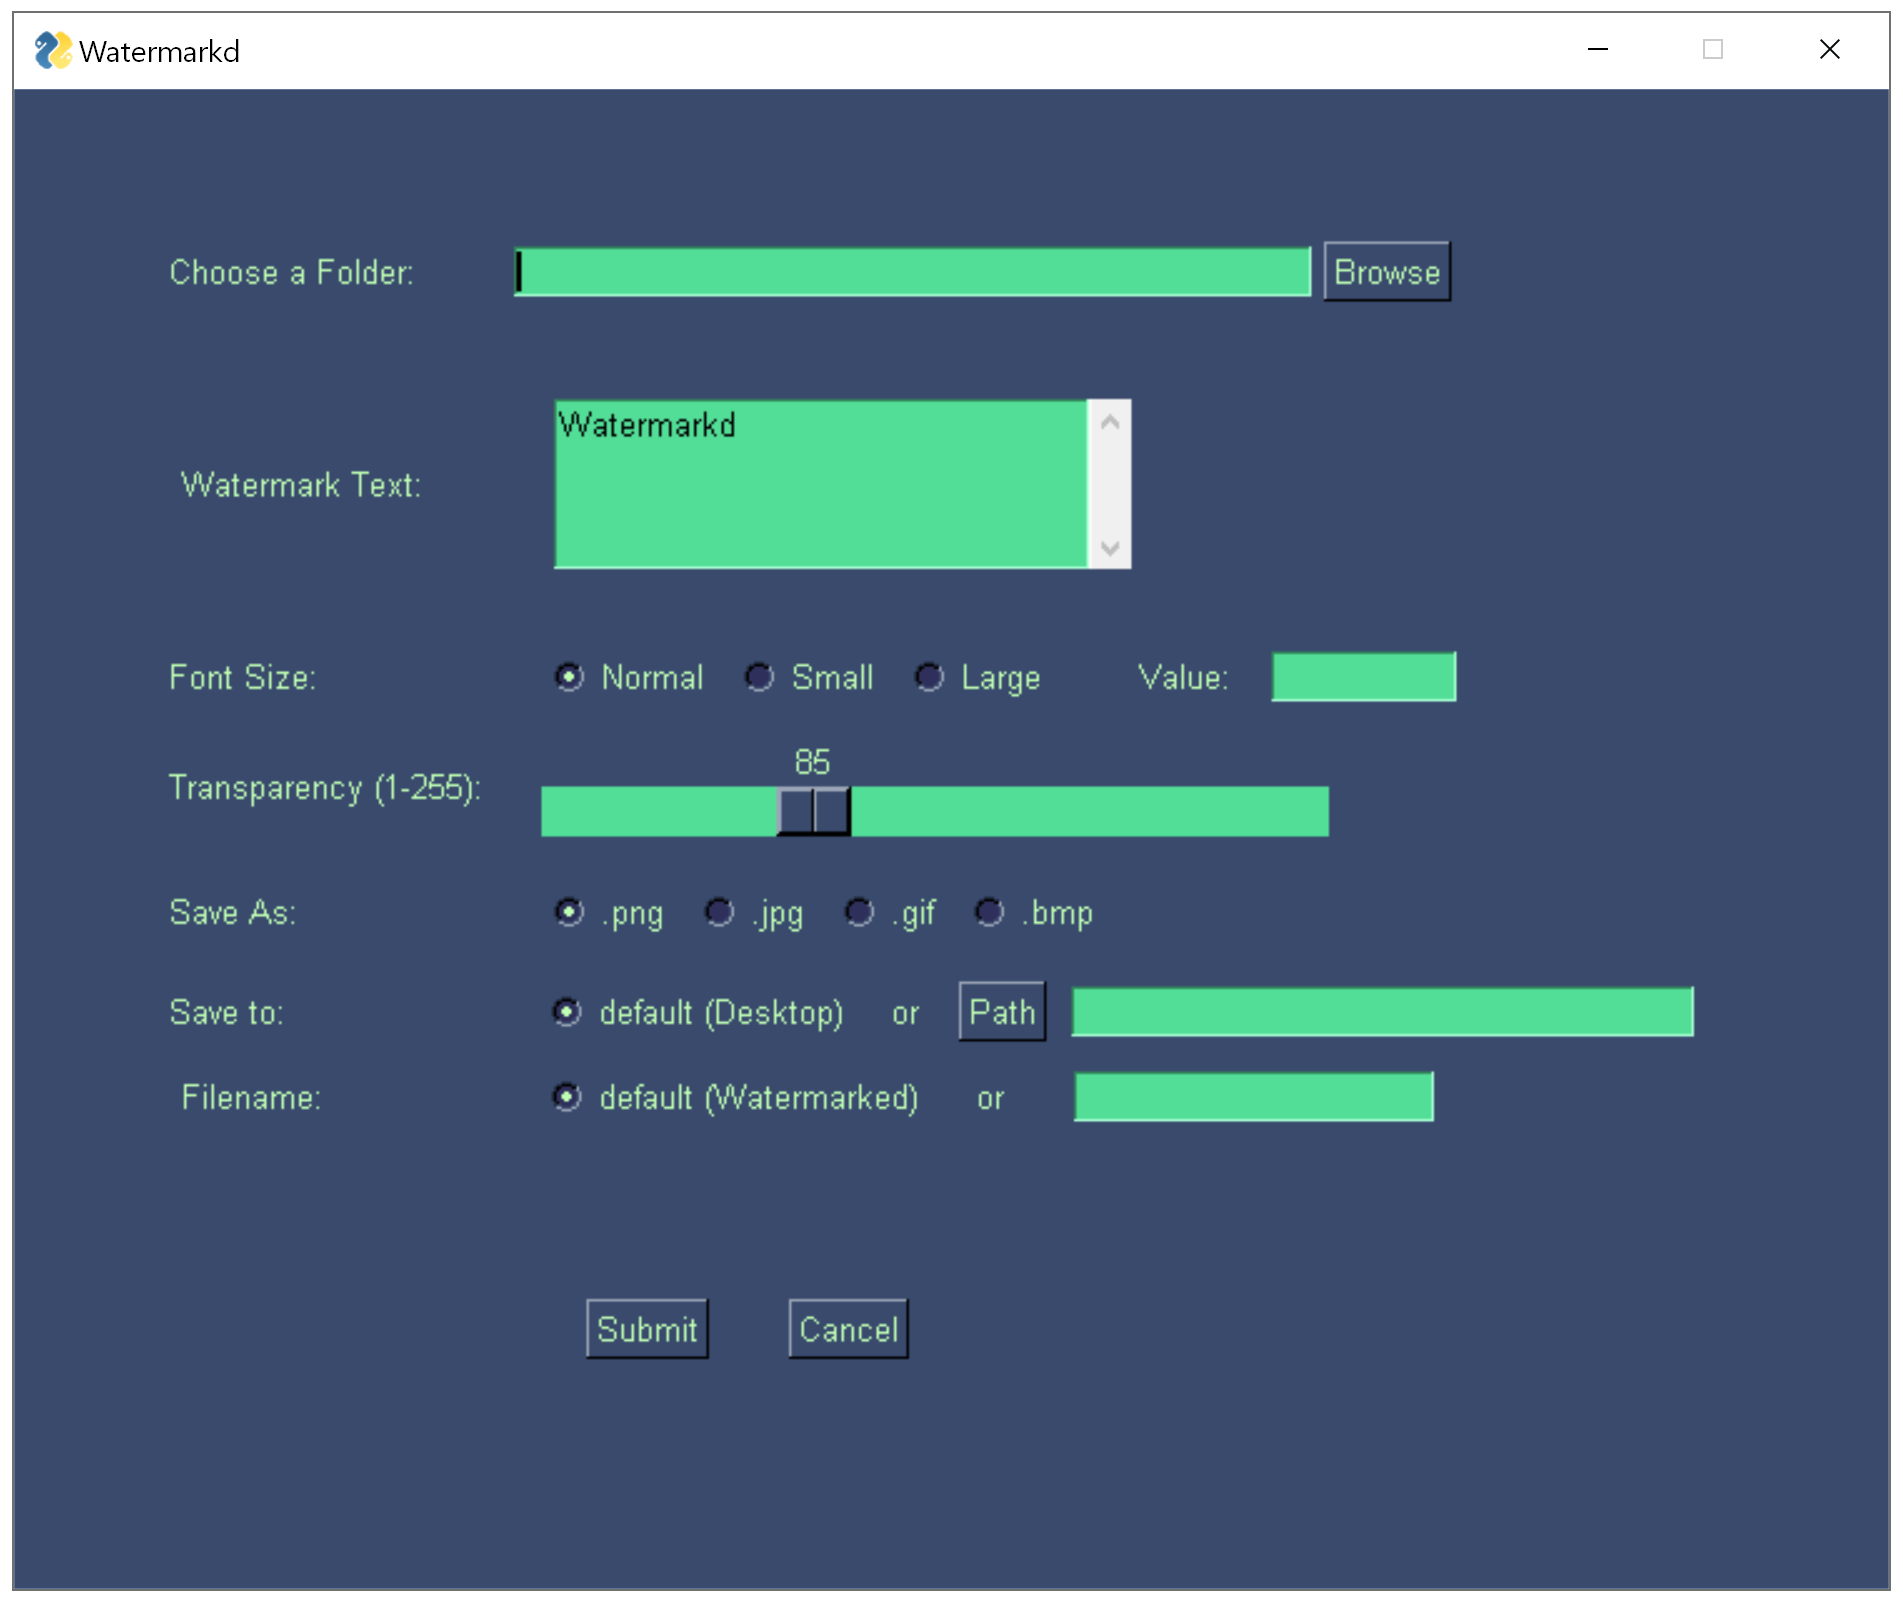
Watermarkd Usage: Batch Function with GUI
Usage with GUI in batch function is also simple and straightforward. It’s mostly overlapping with single function’s steps. Here are the main differences:
- Pick a folder instead of a single image through the Browse button.
- At the bottom file name will be used as a seed to generate multiple images with watermark. For instance, if you choose Work as file name, files will be saved as Work1.jpg, Work2.jpg, Work3.jpg etc.
Once submit is pressed all the inputs from the user get registered and watermarking process will start.
It can last anywhere between miliseconds to a couple of seconds per image depending on the resolution of the image. (For the very high resolutions you might need to allow 2-3 seconds per image which also depends on the availability of computation resources.) After that time watermarked images will be created in the specified folder or default folder if none is specified.
Activate graphical user interface for bath watermarking a folder of images similar to the code in single() function’s case:
from Watermarkd import Spread

Spread.batch(gui=True)
Further Steps with Watermarkd
As much as I’d love to see Watermarkd getting used by people with different backgrounds such as:
- Photographers
- Bloggers
- Entrepreneurs and Business Owners
- Students
- Teachers
- Media Agencies
- Artists, Illustrators
I’d also love to see it being checked out as a learning tool for Python packaging and Python coding in general. It has all the ingredients necessary to comprehend packaging in Python.
Besides packaging topics such as: Pypi repository publishing, Github hosting, licensing etc. It also has fundamental coding topics, but nothing too complicated to discourage an intermediate or even beginner coder, such as:
- For Loop & While Loop
- Conditional Statements (if, elif, else)
- Python Variables
- Data Type Conversions
- Python Classes
- User defined Python functions
- Making use of os library
- File Operations
- Python Operators
Additionally, it’s pretty simple to understand and demonstrates all the ingredients needed to publish a library on PyPI (Python Package Index), such as:
-
- setup.py
- requirements.txt
- License
- Readme.md
- __init__.py
- Graphical User Interface (GUI),
- Databases,
- Packaging,
- Machine Learning,
- Open Source Software Licenses
- Open Source Software in general.
Such topics open up whole new worlds for a programmer to progress towards, you can see them as paths you can take in your journey(Oftentimes you can combine these paths for a great product as well).
Final Thoughts
If you’re a beginner or intermediate programmer go ahead and create a Github account. Maybe create a trivial repository where you take some notes and save some files if you like, just to start getting familiar with the environment.
If you like Watermarkd or Holypython’s work in general, you’re welcome to visit our Github repos as well. You can read the Watermarkd.py source code along with other necessary files there (setup.py, requirements.txt, __init__.py etc.).
As simple as it is, I hope Watermarkd library serves as a practical solution for people who might need watermarking and I’d love to see it serve educational purposes for coders and developers who never had a chance to explore packaging and publishing topics related to Python.
Thank you so much for visiting.
ps: I’d like to thank creators and contributors of Pillow the Friendly PIL Fork and PySimpleGUI libraries for creating such fantastic libraries and influencing further developments. Also, a huge thank you to Stack Overflow community for sharing so much expert level knowledge and being so kind.