This tutorial conveniently makes use of opencv (cv2) library in Python combined with PIL library’s ImageGrab for screen capture and numpy’s numpy.array to get a digital array from visual input.
You can learn how to get a continuous Screen Capture using PIL’s ImageGrab.grab, make use of While Loops, For Loops and User Defined Functions, implement Face Recognition, use pre-trained xml files and discover opencv library, discover opencv’s Canny edge recognition function.
Used Where?
- To capture screen
- Face Recognition
- Interacting with games and software
- Research
- Security
- Surveillance
Let’s import cv2 and time libraries:
from PIL import ImageGrab
import cv2
import numpy as np
Here is a very straightforward implementation of face recognition using Python’s VideoCapture module from cv2 library.
If you’d like to see a Webcam input version of this face recognition Python tutorial instead of Screen Capture just check out this post here.
Estimated Time
15 mins
Skill Level
Intermediate
Modules
ImageGrab, np.array, detectMultiScale, CascadeClassifier, cv2.rectangle, cv2.destroyAllWindows, cv2.imshow, cv2.waitKey
Libraries
PIL, cv2, numpy
Tutorial Provided by
HolyPython.com
Classifier xml files (already trained)
- We need already trained xml files that will facilitate the algorithms for face recognition. You can simply assign them to a variable using cv2.CascadeClassifier.
- You will need one xml file for each eye recognition and face recognition as below:
- You can get the files here.
- You can find bunch of different, high quality classifiers also on official Github page of opencv here. Also go ahead and support this awesome open source project if you can.
face_cascade = cv2.CascadeClassifier(r'c:\Users\tt\Desktop\haarcascade_frontalface_default.xml')
eye_cascade = cv2.CascadeClassifier(r'c:\Users\tt\Desktop\haarcascade_eye.xml')
cvtColor and Canny methods of opencv
- A helper function called process_img, which will later be called under the main function below, converts image to gray for processing convenience and also implements Canny method which is a sophisticated edge recognition function.
- Using Canny method is spoiling as it does all the complicated science and tech in one word but it is a very interesting machine learning concept. You can read more about it on the official open cv page here. What it does basically is it helps define the edges of objects in the visual.
def process_img(image):
    original_image = image
    processed_img = cv2.cvtColor(image, cv2.COLOR_BGR2GRAY)
    processed_img =  cv2.Canny(processed_img, threshold1 = 200, threshold2=300)
    return processed_img
Main function for face/eye recognition and rectangle drawing
Our main function, also called main(), is going to include a while loop that contains pretty much the whole code and it’s also going to call the process_img function.
def main():

    while True:
        screen = np.array(ImageGrab.grab(bbox=(0,40,1200,1200)))
        new_screen = process_img(screen)
        faces = face_cascade.detectMultiScale(screen, 1.35, 5)

        for (x,y,w,h) in faces:

            cv2.rectangle(screen,(x,y),(x+w,y+h),(255,255,0),2)
            roi_gray = screen[y:y+h, x:x+w]
            roi_color = screen[y:y+h, x:x+w]

            eyes = eye_cascade.detectMultiScale(roi_gray)

            for (0x,0y,0w,0h) in eyes:
                cv2.rectangle(roi_color,(0x,0y),(0x+0w,0y+0h),(0,127,255),2)

        cv2.imshow('img',screen)

        if cv2.waitKey(25) & 0xFF == ord('q'):
            cv2.destroyAllWindows()
            break

main()
Code breakdown
Now let’s break down the code above and analyze some critical lines for learning:
- Under the main function
- Infinite While loop grabs your screen continously.
- A helper function process_img is called to convert image input to gray scale and implement edge detection using Canny.
- face_cascade.detectMultiScale is used to facilitate object detection based on trained face recognition file.
- Secondly, scaleFactor helps reduce image sizes from the input. This parameter can be important because trained data has a fixed size for each face and you might want to use reduction by a scale factor so that your algorithm runs faster. For instance: 1.04 will only reduce input image sizes by 4% but this will take more computing resources. On the other hand you can use something like 1.5 which will use a reduction factor of 50% and this will be way more efficient however, this may cost some of the faces to be not recognized in your input. This is definitely something to experiment with to find an optimal value.
- minNeighbors is another important parameter. This signifies the minimum neighbor each rectangle needs to have for a face to be detected. Usually takes a value between 3-6
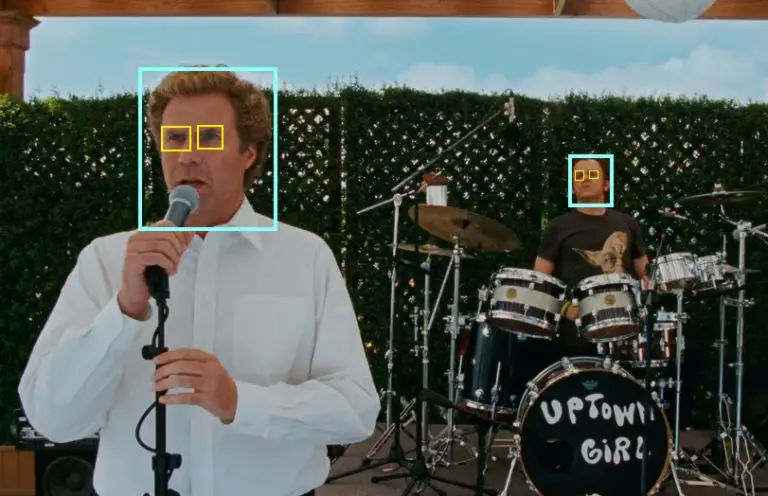
- Rectangles are drawn.
- After that, another for loop is used to recognize the eyes for each face and then draw the boxes for the eyes similarly.
- Finally using imshow() method you can show the image with the boxes of face recognition and eye recognition.
- Screen Input window is to be closed by pressing “q”.
- At last Webcam input is released and all cv2 windows are terminated to clean up the operation.
- main function is called in the last line as main().
Conclusion
- That’s all it takes to write a face recognition code in Python. Obviously it’s a high level implication but that doesn’t mean it’s not programming. If you’d like to dig deeper in this topic check out how face recognition technology works and how xml files represent the training that facilitates the application of this code.
- This is a twist of webcam face recognition code that was published here. Using this version you can actually run your code on whatever is on your screen. This might enable further ideas such as analyzing faces in a movie, tv stream, or personal videos.
- Another difference of this tutorial is that, it’s slightly tidier employing the user defined functions: main and processed_img, a great practice for user defined functions indeed.