There are multiple ways to schedule a Python program, task, event or script in Windows Operating System.
In this Python tutorial we will demonstrate various different methods that can be helpful for scheduling tasks or events:
- Manually creating a scheduled event (Windows Task Scheduler)
- Automated Task Scheduling via Pywin32 library
How to Schedule Python w/ Windows Task Scheduler (Manual Way)
This is pretty simple to achieve but there are some details to consider.
- Write a Python program that works.
- Save your Python program as a .py file.
- Open Windows Task Scheduler
1- Let’s create a really simple Python program.
I’ll simply print Hello World! But also, I’ll do a little trick here by using time library as well.
If we don’t create a delay function program will run in a tiny fraction of a second and disappear so it will be hard to observe. So, let’s add a 10 second sleep time after the print function.
Estimated Time
15 mins
Skill Level
Upper-Intermediate
Modules
.Dispatch
.Connect, .GetFolder
.NewTask
Libraries
win32com, os
win32com.client
import time
print("Hello World!")
time.sleep(10)
We have a simple but decent program for demonstration already. Let’s move on to saving file as .py step.
2- Saving a file as .py file is easy. One needs to simply navigate to file tab in any IDE.
From there,
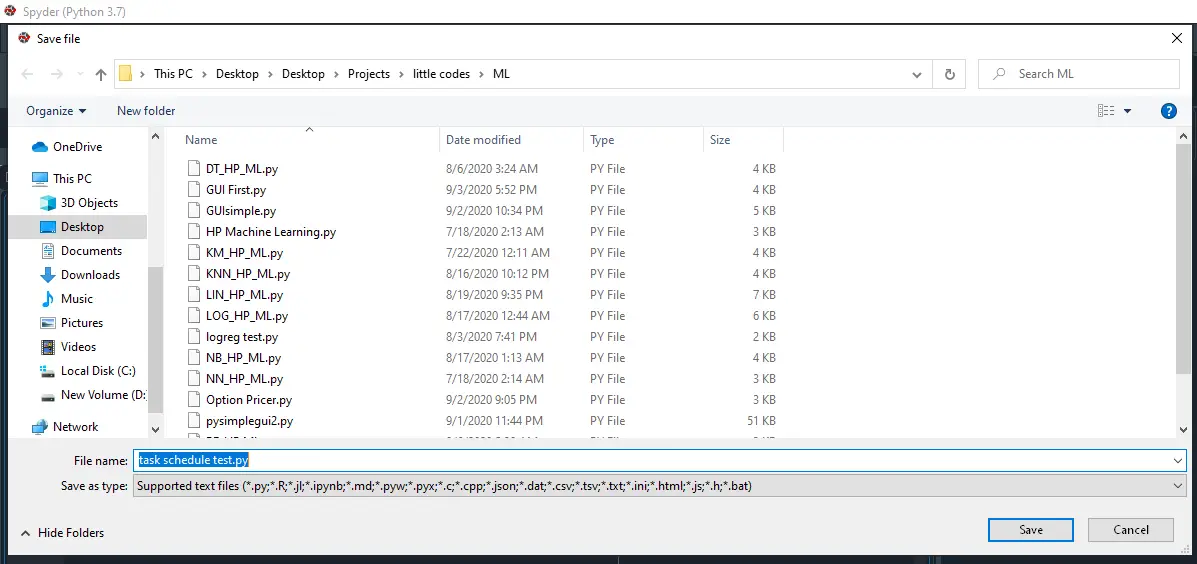
Another way to create a .py file is simply using Notepad from Windows, especially when the code is this simple it’ll work like a charm.
However, there is something you gotta pay attention to:
You gotta make sure save as type: section of the window is at “All Files(*.*)” otherwise whatever you type Notepad will add .txt to the end of the file and you will end up with something like: test.py.txt.
We don’t want that, we want test.py only (Replace test with whatever name you want). So just make sure type is set to All Files like below.

3- Now, it’s time to schedule the application we created. Simply Navigate to Start of Windows and type Task Scheduler. Then, Go ahead and open the app.
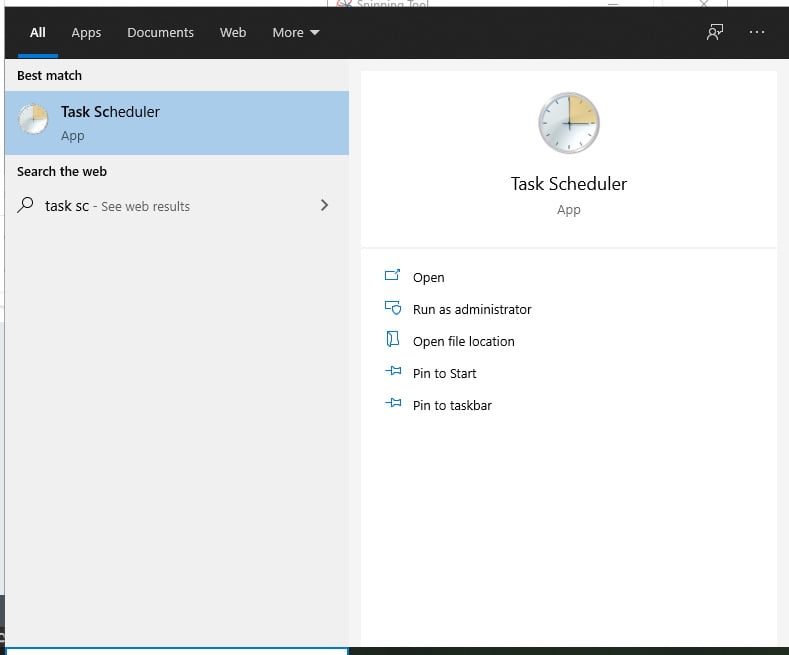
3- Now, it’s time to schedule the application we created. Simply Navigate to Start of Windows and type Task Scheduler. Then, Go ahead and open the app.
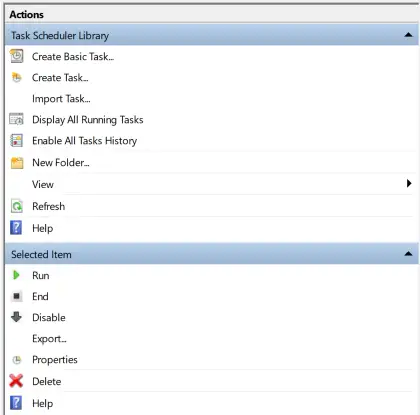
You’ll see Actions section on the right side. Click Create Task to create a new task.
A new window will pop up and you’ll need to take care of 3 things there. This is the final step. 3rd step is important to understand and get it right for the program to execute properly when it’s due.
- Give your task a name
- Choose a trigger (such as time or upon logging in etc.)
- Create new Action (Choose Python.exe and Program you created.)
On the final step, when creating trigger
- program/script will be your Python.exe path
- This part is usually wherever your Python is installed. If you have Anaconda it’s likely something like:
- C:\Anaconda3\python.exe or D:\Anaconda3\python.exe
- argument will be the path to the code you have saved as .py file.
- This depends where you’ve saved your file. Path can be something like:
- C\Users\ABC\Desktop\test.py
So, basically what’s happening here is that you’re scheduling Python.exe to run as a program and then you’re passing your own program, script, task, code or whatever you wanna call it as an argument to Python.exe.
Since, we have created a 10 second delay in the code. Hello World! will beautifully appear on the screen for 10 seconds. Plenty of time for you to feel accomplished.

As a practice, I recommend doing this whole operation by yourself after reading this Python tutorial. Also, for the first time you can save your code with print(“Hello World!”) only to observe the phenomenon that we’ve mentioned above. In that case your code will flash for a tiny moment and disappear before you have a chance to read it.
How to Automate Task Scheduling w/ Python (pywin32 library)
We can directly connect to Windows Task Scheduler from Python via pywin32 library. This can be very powerful if you want to finish everything from inside Python.
Another time it can be very useful is when your Python program has a GUI and you don’t want the user to go to Task Scheduler separately to schedule events.
Think applications like
- alarm clock,
- maintenance,
- cleaning,
- reminder,
- update checker,
- reporter,
- email sender,
- financial market checker,
- database updater
- etc. -anything that might make sense to schedule.
So, how are we going to achieve this noble goal? By using pywin32 library. Below, you can see an example that you can actually directly modify and implement. This application is consisted of 6 basic steps:
- Importing necessary libraries: win32com.client from pywin32 and datetime for tracking or expressing time data.
- Creating a connection to the Task Scheduler Client: Also includes the handle for the new task.
- Creating the trigger: This is where we decide what kind of trigger we want for the task (Typically a specific time or event such as logging in)
- Creating the action: This is where we introduce our program to the Task Scheduler. Since this one will be a .py file, we need to pass 2 values, this is important to get right.
- action.Path will be the path to python.exe
- action.Argument will be the path to the .py file
- Additional parameters such as description will be passed.
- Our task is fully ready to be saved. This step will finalize the process and add the task to the Task Scheduler. (You may wanna close the Task Scheduler Window if it’s already opened manually to avoid any conflict although this script will still add the task which may not show up on the open window.)
#Import Libraries
import datetime as dt
import win32com.client
#Connection to Task Scheduler
task = win32com.client.Dispatch('Schedule.Service')
task.Connect()
root_folder = task.GetFolder('\\')
newtask = task.NewTask(0)
# Trigger
set_time=dt.datetime(2020,9,4,18,44,0,500000)
TASK_TRIGGER_TIME = 1
trigger = newtask.Triggers.Create(TASK_TRIGGER_TIME)
trigger.StartBoundary = set_time.isoformat()set_time variable is used to define the exact time task is being scheduled to. So, you can adjust the first line accordingly.
Alternatively, you can schedule time to something like “5 minutes from now” or “2 hours from now” or “same time tomorrow”. Just refer to this code snippet for that:
set_time = dt.datetime.now() + dt.timedelta(minutes=1)
# Action
TASK_ACTION_EXEC = 0
action = newtask.Actions.Create(TASK_ACTION_EXEC)
action.ID = 'DO NOTHING'
action.Path = r'C:\Anaconda3\python.exe'
action.Arguments = r'C:\Users\ABC\Desktop\new3.py'
action.Path is the path to your python.exe file. If you have Anaconda3 installed it should be something like above, you might want to double check your Python or Anaconda installation.
action.Argument is the path to whatever .py file you’re trying to schedule.
Basically we’re passing the .py file as an argument to python.exe program. python.exe is the actual program being scheduled here and program (or task or code or event or script) in the .py file is being passed as an argument.
You can adjust the Task Description according to your task.
# Parameters
newtask.RegistrationInfo.Description = 'Python Task Test'
newtask.Settings.Enabled = True
newtask.Settings.StopIfGoingOnBatteries = False
Finally, task gets saved in this step,
- First argument in the .RegisterTaskDefinition() method is the name of the task. Here we’re using “PTT” (short for Python Task Test) as name, it can be anything you want.
- Second argument here is newtask. This is the task we have been constructing (has action data, trigger data, description data etc.)
- We also have username and password sections when needed (Possibly when saving a task for another user). In this case, these arguments are empty.
# Saving
TASK_CREATE_OR_UPDATE = 6
TASK_LOGON_NONE = 0
root_folder.RegisterTaskDefinition(
    'PTT',  # Python Task Test
    newtask,
    TASK_CREATE_OR_UPDATE,
    '',  # No user
    '',  # No password
    TASK_LOGON_NONE)
That’s all. This code should work from the get go with a few basic adjustments. You can find the full code on HolyPython Github Repository here.
If you’re interested in combining this knowledge with a GUI application you created with Python you can check out this tutorial about GUI applications with Python.