Previously we’ve demonstrated how to create a GUI layout, window, text and buttons with Python in the previous GUI tutorial. (PySimpleGUI Part I). We’ve also seen numerous ways to style them with builtin styles and themes as well as pick colors and adjust sizes for numerous items such as buttons, titles and text.
We’ve also discussed the benefits of jumping into GUI as a coder and that really can’t be emphasized enough.
Holy Python is reader-supported. When you buy through links on our site, we may earn an affiliate commission.
Particularly PySimpleGUI is very very practical. It gets the job done and super simple and straightforward although there are more advanced, complex, complete, customizable and mission oriented GUI libraries out there such as:
- Kivy (Mobile application oriented)
- PySide 2
- Dabo (A Database oriented wxPython repackage)
- PyGUI
- Libavg (Media Oriented Applications)
And it consist of features from some of the better known Python GUI libraries such as:
- Python Tkinter
- Remi
- PyQt5
- wxPython
Estimated Time
15 mins
Skill Level
Intermediate
Important Parameters
.CheckBox, .Radio
.Button, .Text, .T
.Window
Libraries
PySimpleGui
Part II: Checkboxes and Radio Buttons (w/ Implementation and Examples)
In this continuation tutorial let’s discover ways to create and read inputs from various very useful GUI items that were briefly mentioned in Part I. These are:
- Checkboxes
- Radio Buttons
As you will see these additions will multiply the functional possibilities of tools that can be built by orders of magnitude.
Also, a couple points can seem slightly confusing with the lack of examples and demonstrations but don’t worry we created a tutorial that makes everything clear at first sight and you’ll be able to hit the ground running.
Please note this part is not only about creating checkboxes or radio buttons but also about making them work. Passing key argument to the items will be crucial in this objective as you will see in the examples.
1- Checkbox Example with PySimpleGUI (Python Implementation)
Often, software requires additional input from the user and main mechanisms are coded to be able to respond to those preferences. In this case, boolean selection items such as radio buttons or checklists become incredibly useful. In principal:
- Radio buttons are used when either one of the options must be selected
- Checklist boxes are used when either one or more options can either be checked or left unchecked.
In either case the options will be represented as True or False based on the input and this can be used as input to your code and particularly conditional statements in your code. There are probably infinite cases but some examples from the top of my head are:
Possible Checklist Boxes:
- Red | Green | Blue | Black | White
- Italic | Bold | Underline | Strike
These are just some simple probable examples from real life.
So let’s get to the juicy part, how do we actually create them and you’re not done once they are created, how to interpret / implement their input in the code.
Let’s build on the things we’ve accomplished in the first tutorial. (If you need a refresher on layout or window check out Part I.)
Creating checkbox or checklist box with PySimpleGUI is easy. Here is the little piece of code you need. You can assigne a title and a default boolean state (here it’s True).
[sg.Checkbox('My Checkbox', default=True)]
Now let’s create something more complete with it. Let’s start simple. Imagine a Hello World button like in the first tutorial but with a checkbox. If the checkbox is not checked nothing happens and if the checkbox is checked on the user interface, Hello World prints the message.
(A small note here, sometimes PySimple GUI doesn’t register first button presses upon startup so you might want to double press. I wasn’t able to troubleshoot or debug why this glitch happens.)
I’m just using sg.T(“”) as a means to create row margin space and also column margin space. Basically it’s to help center the content.
Otherwise this layout would be enough:
layout = [[sg.Button('Hello World',size=(20,4))],
          [sg.Checkbox('Print On:', default=True)]]
Here is the full code for a centered button with a checkbox which has default False state:
import PySimpleGUI as sg
layout = [[sg.T("")],[sg.T("        "), sg.Button('Hello World',size=(20,4))], [sg.T("")],
          [sg.T("                   "), sg.Checkbox('Print On:', default=True)]]

###Setting Window
window = sg.Window('Push my Buttons', layout, size=(300,200))

###Showing the Application, also GUI functions can be placed here.
while True:
    event, values = window.read()
    if event == sg.WIN_CLOSED or event=="Exit":
        break

window.close()
So far so good. But this is just a pretty GUI. It won’t do anything because we didn’t define anything for it to do. It’s easy but this part is important. You can apply this knowledge to many other GUI items in PySimpleGUI.
Input value can be acquired by adding a key parameter inside items like this:
layout = [[sg.Button('Hello World',size=(20,4))],
          [sg.Checkbox('Print On:', default=False, key="-IN-")]]
When we read the window as:
event, values = window.read()
keys will be stored in the values.
Now, “-IN-“ is this checkbox’ key. We will be able to look up checkbox’ value with this key. Check this out:
This checkbox can particularly be read with:
values["-IN-"]
while True:
    event, values = window.read()
    if event == sg.WIN_CLOSED or event=="Exit":
        break
    elif values["-IN-"] == True:
        print("Hello World")
This is likely the most confusing part and I hope it’s clear. If you need to brush your knowledge on topics you can visit these lessons: Python While Loops Lesson and Python Conditional Statements with If, Else, Elif.
Here is a full and functioning code that you can use, it will only print when the box is checked (True boolean state):

import PySimpleGUI as sg
layout = [[sg.T("")],[sg.T("        "), sg.Button('Hello World',size=(20,4))], [sg.T("")],
          [sg.T("                   "), sg.Checkbox('Print On:', default=True, key="-IN-")]]

###Setting Window
window = sg.Window('Push my Buttons', layout, size=(300,200))

###Showing the Application, also GUI functions can be placed here.

while True:
    event, values = window.read()
    if event == sg.WIN_CLOSED or event=="Exit":
        break
    elif values["-IN-"] == True:
        print("Hello World")

window.close()
2- Radio Button Example with PySimpleGUI
Radio buttons are other useful GUI items that offers options to the user. The main difference is you can select multiple radio buttons. It forces you to opt in for only one of the options in the same group.
Potentially a user may have to make decision like these with radio buttons on a graphical user interface:
Possible Radio Buttons:
- Big | Small
- Encrypted | Not encrypted
- Attachment | No attachment
- Receipt | No Receipt
- Private | Public
- Am | Fm | Longwave | Shortwave
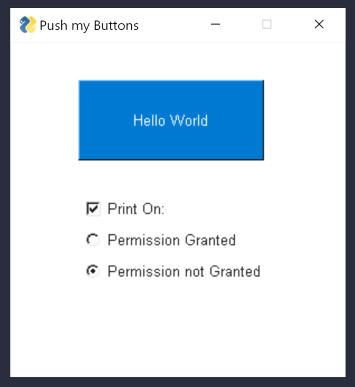
[sg.Radio('Permission Granted', "RADIO1", default=False)],
[sg.Radio('Permission not Granted', "RADIO1", default=True)]
Code for radio buttons in PySimpleGUI is also easy.
- First parameter is the radio button’s title.
- Second parameter is the radio button’s group. (Only one button in the same group can be selected)
- Third parameter is its default state. ()
Let’s build on the first example. Let’s say it only prints if the checkbox is checked plus if the “Permission Granted” radio button is selected.
I’m defining keys as -IN-, -IN2- to have a system. You can assign pretty much any string value to them.
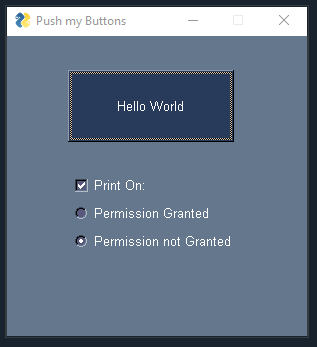
import PySimpleGUI as sg
layout = [[sg.T("")],[sg.T("        "), sg.Button('Hello World',size=(20,4))], [sg.T("")],
          [sg.T("         "), sg.Checkbox('Print On:', default=True, key="-IN-")],
          [sg.T("         "), sg.Radio('Permission Granted', "RADIO1", default=False, key="-IN2-")],
          [sg.T("         "), sg.Radio('Permission not Granted', "RADIO1", default=True)]]

###Setting Window
window = sg.Window('Push my Buttons', layout, size=(300,300))

###Showing the Application, also GUI functions can be placed here.

while True:
    event, values = window.read()
    if event == sg.WIN_CLOSED or event=="Exit":
        break
    elif values["-IN-"] == True and values["-IN2-"] == True:
        print("Hello World")

window.close()
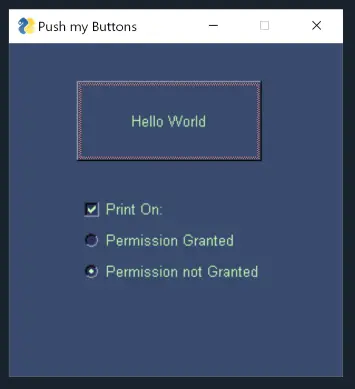
Themes (Prettify GUI real quick)
You can also apply predefined color schemes as demonstrated in the Python GUI Tutorial Part I.
This can be done using sg.theme() method in PySimpleGUI. Let’s create a couple of colorful versions for the simple GUI programs we’ve created.
It’s as simple as adding this code after importing the libraries:
sg.theme("DarkBlue15")
(For different theme names check out the first tutorial)
Here is the code, don’t forget to add the event loop, the part that starts with while True:
import PySimpleGUI as sg

sg.theme("DarkBlue15")
layout = [[sg.T("")],[sg.T("        "), sg.Button('Hello World',size=(20,4))], [sg.T("")],
          [sg.T("         "), sg.Checkbox('Print On:', default=True, key="-IN-")],
          [sg.T("         "), sg.Radio('Permission Granted', "RADIO1", default=False, key="-IN2-")],
          [sg.T("         "), sg.Radio('Permission not Granted', "RADIO1", default=True)]]

window = sg.Window('Push my Buttons', layout, size=(300,300))
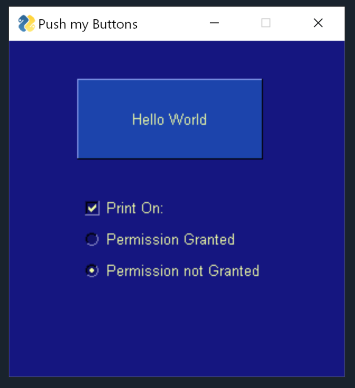
I really like DarkBlue15, it’s got a “Bios”y look.
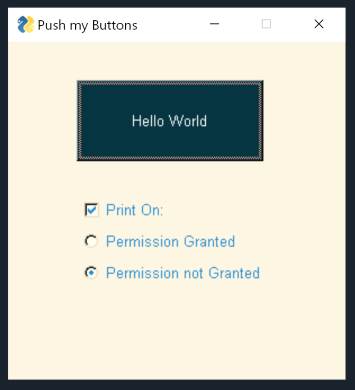
And here is Tan:
And finally reddit is really nice with a minimalistic standard look with slightly enhanced color profile and DarkTeal2 theme also looks really sleek:
Here are some more ideas to check out:
Black
TealMono
TanBlue
LightGreen1
PySimpleGUI’s themes are really heaven sent if you want to achieve some nice visual results without spending too much time. I feel like lots of programmers, coders, entrepreneurs, especially without the means to hire design team because they are in the beginning of their journey or they simply choose to perform solo fit in this group.
It really helps to get maximum visual results with minimum time and effort when you are on a tight budget time and resource wise.
Closing Thoughts (Summary and What's Next)
We have demonstrated checkboxes and radio buttons in PySimpleGUI which is a great Python GUI library that really packs a punch especially given its minimalist structure.
Also, this tutorial was about how to get input and how to use GUI input in the code. This is a crucial knowledge that adds many new dimensions to a beginner programmer’s toolset.
Imagine those game or app installation user interfaces. You could pretty much achieve any installation UI with the Python knowledge provided in Part I (buttons, text, theme, size, alignment settings) and Part II (checkboxes, radio buttons, reading user input) of Python GUI tutorial series.
In the next tutorial (Part III) we will discover Browser Features and how to make use of it with code implementation examples in Python.

You can also find the complete code in this page via this link: HolyPython Github repository. You can also find the official repository page of PySimpleGUI library here.
This was Part II of Python PySimpleGUI GUI tutorial series.
Thank you for visiting!
Please share this post if you found it useful.